Friday 30 June 2023

Happy Little Stampers ~ July Watercolour Challenge

Can you believe it? Half of 2023 has already passed. I feel that life has definitely sped up. July! That brings a new challenge at Happy Little Stampers ~ Watercolour Challenge


Here's my card


For my card, I used Altenew's Modern Poinsettia stamp. I heat embossed the beautiful flower image with gold embossing powder on an A2 panel of 96 lb bristol. I added colour with distress inks - abandoned coral, fossilized amber by smooshing the ink on a plastic place mat and picking up the ink with a wet paint brush. I varied the amount of water to get the lighter and darker areas. When I was happy, I left the panel to dry. Once dry, I found that I had to put it under some heavy books to flatten it out. I heat embossed the sentiment from The Ton's Holiday Flourish stamp set, again with gold embossing powder. I trimmed the panel slightly and matted with gold cardstock to complete my card.

We'd love to see your watercolour creations in our gallery this month.

Thanks for stopping by
sue

This site uses cookies from Google to deliver its services and analyze traffic. Your IP address and user-agent are shared with Google along with performance and security metrics to ensure quality of service, generate usage statistics, and to detect and address abuse.

Die Cut Divas ~ Last Day of June Challenge with SheepSki Designs

Is it just me or are the months just flying by? Maybe I got lulled into another dimension during the Covid lockdown when it seems like years past when in fact it was only a few days. It's hard to believe that it's almost July. Well, it's the final day of Die Cut Divas June Challenge. The challenge this month is 

CRITTERS

Our sponsor this month is SheepSki Designs. They will be awarding our winner, three digital images of their choice from their online store. 


Here's my card


For my card, I started with SheepSki Design's For You digital stamp. I sized it with my laptop and printed it out onto cardstock with my inkjet printer. I added color with Copic markers - C2, C5, R11, V12, V15, Y15. I die cut the image with a Waffle Flower Additional A2 Layers die. I added a light purple mat, die cut with a Waffle Flower A2 Layers die. For the sentiment, I used Clearly Besotted's A Little Sentimental stamp set, stamped onto a scrap of light purple and die cut with a die from My Favorite Things Skinny Strips die-namics set. I glued the sentiment strip to the panel and the matted panel to a white A2 card base to complete my card.

We'd love to see your Critter creations in our gallery. Please remember to include at least one die cut.

Thanks for stopping by
sue

This site uses cookies from Google to deliver its services and analyze traffic. Your IP address and user-agent are shared with Google along with performance and security metrics to ensure quality of service, generate usage statistics, and to detect and address abuse.

Tuesday 27 June 2023

Addicted to Stamps and More! Challenge #449

Hey Crafty Friends! It's time for a new challenge at Addicted to Stamps and More! 


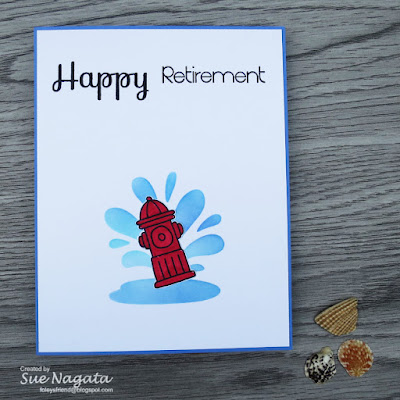
This "Any Occasion" challenge came at the perfect time. A co-worker was retiring. Here's my card


I feel like I need to explain! LOL! Mark worked for the Waterworks Department of the City and was retiring. When I met him 25 years ago, he was a M-Scope operator. He retired as a Superintendent of the hydrants and valves section - hence the hydrant. Every once in awhile, a car will hit the hydrant and water will flow in every direction. That was kind of what I was going for on this card. I used Clearly Besotted's Splish Splash stencil and blueprint sketch, salty ocean, peacock feathers and mermaid lagood distress inks applied with oval ink blending brushes. For the hydrant, I used Avery Elle's Dog-Gone stamp set. I stamped the hydrant with Memento Tuxedo Black ink and added color with Copic markers - R29. I fussy cut the image and glued it over the splashes of water. For the sentiment, I used Clearly Besotted's Happy Days stamp set. I trimmed the white A2 card panel slightly and matted with a royal blue A2 card panel which was then adhered with double sided tape to a white A2 card base to complete the card.

We'd love to see your "Any Occasion" card in our gallery this fortnight.

Thanks for stopping by
sue

This site uses cookies from Google to deliver its services and analyze traffic. Your IP address and user-agent are shared with Google along with performance and security metrics to ensure quality of service, generate usage statistics, and to detect and address abuse.

Monday 26 June 2023

Atlantic Heart Sketch Challenge #531

Working sure does get it the way of my crafting! However, how else am I to pay for all my crafting goodies that keep arriving at my door? Well, at least it's still Monday (here) and that means it's time for a new challenge at Atlantic Hearts Sketch Challenge. Here's our sketch


Here's my card


For my card, instead of using striped patterned paper for the background near the top of the card, I used an embossed panel using Provocraft Cuttlebug D'Vine Swirls embossing folder and white cardstock. The sentiment was stamped on a scrap of light gray cardstock with Papertrey Ink's Keep It Simple: Birthday stamp set and Versafine Onyx Black ink. I cut the scrap of light gray into a double fish-tail banner. For the flowers, I chose bright colors and My Favorite Things Flower & Leaf Trio die-namics dies and a regular hole punch with black cardstock for the flower centers. 

We'd love to see how you're inspired by our sketch. Please add your cards to our gallery.

Thanks for stopping by
sue

This site uses cookies from Google to deliver its services and analyze traffic. Your IP address and user-agent are shared with Google along with performance and security metrics to ensure quality of service, generate usage statistics, and to detect and address abuse.

Tuesday 20 June 2023

Try Stampin' On Tuesday ~ Challenge #612

Happy Tuesday! It's time for a new challenge at Try Stampin' On Tuesday. Here's our challenge


Here's my card


For my card, I followed the sketch. I couldn't find enough "nautical" stuff to incorporate the photo inspiration onto my card. I started my card by stenciling, using Heffy Doodle's Stoney Maloney stencil and pumice stone and hickory smoke distress inks applied with oval ink blending brushes on a light gray A2 card panel. For the rocks, I used Gerda Steiner Designs' You Rock stamp set. I stamped the two rocks (they are together) and the guitar playing rock onto white cardstock using Memento Tuxedo Black ink. I added color with Copic markers - C2, C3, C5, RV29, W2, W3, YG63. I fussy cut the images and glued them onto my card panel. I stamped the sentiment in the opposite corner. I adhered the panel to a white A2 card base to complete my card.

We'd love to see you creations in our gallery. Will you use the sketch, or the photo inspiration or both? It's up to you!

Thanks for stopping by
sue

This site uses cookies from Google to deliver its services and analyze traffic. Your IP address and user-agent are shared with Google along with performance and security metrics to ensure quality of service, generate usage statistics, and to detect and address abuse.

Saturday 17 June 2023

Addicted to CAS ~ Challenge #240

Hello Crafty Friends! It's time for a new clean and simple challenge at Addicted to CAS. For the next two weeks, our challenge will be


Here's my card


For my card, I used supplies that I received as part of the Crop & Create Delivered October 2021 kit. These supplies were provided for a Stamp Market class. I used the A Bit of Everything die set to die cut the white heart, with the thank you words cut out. When you die cut the heart, you also die cut the heart frame at the same time. So I die cut the heart and frame twice, eventhough I only needed two of the white heart frames. I then cut 1/8" strips from scraps of cardstock - purple, blue, teal, green, yellow, orange, red. In order to have something to adhere the strips to, I traced the heart die cut from white printer paper and cut it just a bit smaller than the traced heart. I spread glue on the white printer paper and glued the strips in rainbow order to it. Before gluing the strips to the back of the heart die cut, I trimmed the strips so that they would not extend beyond the white heart die cut. I then stamped the "so very much" using the A Bit of Everything stamp set. On a white A2 card base, I adhered the white frames and I popped up the die cut heart with dimensionals. 

We'd love to see your creations using our "Rainbow Colours" code word in our gallery this fortnight.

Thanks for stopping by
sue

This site uses cookies from Google to deliver its services and analyze traffic. Your IP address and user-agent are shared with Google along with performance and security metrics to ensure quality of service, generate usage statistics, and to detect and address abuse.

Friday 16 June 2023

Growing in Unity 2023 ~ Day 5

Can't believe that my week as the Growing in Unity 2023 person has reached the end. It's been fun. Unity Stamps is an American company, based in Minnesota. They have a vast collection of red rubber stamps, as well as patterned papers, dies, Unity swag, and other crafting supplies. I am so grateful to them for giving me this opportunity to showcase some of their products.


Here's my card


For my card, I used a stamp from Unity's Kit of the Month - June 2018 called We Can Rise. I stamped the flowers and foliage onto 140 lb Strathmore watercolour paper with Versafine Onyx Black ink. I added color with distress inks - abandoned coral, wilted violet, twisted citron, mowed lawn, chipped sapphire, tumbled glass. I smooshed the ink on a plastic place mat and picked up some ink with a wet brush and applied it to the panel. I altered the amount of water used to created darker and lighter areas. I added the tumbled glass to the area around the focal panel to give it some color and interest. When the panel dried, I trimmed the panel to just slightly smaller than A2 size and matted with a black A2 panel. I then adhered it to a white A2 card base to complete my card. I left my card without a sentiment so that I could use it in for a variety of occasions.

I will be choosing two winners randomly from those who leave me a comment on my blog, over my five days as the Growing in Unity Person and will be posting the winners' names on the Facebook - Growing in Unity - Cardmaking/Rubber Stamping group. 

Thanks for stopping by
sue


This site uses cookies from Google to deliver its services and analyze traffic. Your IP address and user-agent are shared with Google along with performance and security metrics to ensure quality of service, generate usage statistics, and to detect and address abuse.

Thursday 15 June 2023

Growing in Unity 2023 ~ Day 4

Sadly, almost through my week as the Growing in Unity 2023 person. Unity Stamps is an American company, based in Minnesota. They have a vast collection of red rubber stamps, as well as patterned papers, Unity swag, and other crafting supplies. I am so grateful to them for giving me this opportunity to showcase some of their products.


Here's my card


I just adore this Unity Stamp Winnie the Pooh - How Do You Spell Love? stamp set. The image is super cute and I love the sentiments. I stamped the image on white cardstock with Memento Tuxedo Black ink. I added color with Copic markers - B12, E25, RV02, RV04, V04, Y17, YG23. I used the YG23 as grass, to ground both Piglet and Pooh. I then die cut the image using a stitched circle die. I stamped the sentiments on a brown envelope that I'm re-using and trimmed the strips to size. I found some patterned paper with writing. I thought it was appropriate for Winnie the Pooh. I also used a larger piece of the brown envelope for the A2-sized panel to which the patterned paper is attached. I adhered it to a white A2 card base to complete my card. 

I will be choosing two winners randomly from those who leave me a comment on my blog, over my five days as the Growing in Unity Person and will be posting the winners' names on the Facebook - Growing in Unity - Cardmaking/Rubber Stamping group. 

Thanks for stopping by
sue


This site uses cookies from Google to deliver its services and analyze traffic. Your IP address and user-agent are shared with Google along with performance and security metrics to ensure quality of service, generate usage statistics, and to detect and address abuse.

Wednesday 14 June 2023

Growing in Unity 2023 ~ Day 3

Halfway through my week as the Growing in Unity 2023 person. Unity Stamps is an American company, based in Minnesota. They have a vast collection of red rubber stamps, as well as patterned papers, Unity swag, and other crafting supplies. I am grateful to them for giving me this opportunity to showcase some of their products.

Here's my card


For those who know me, they know I love bright colors. For a change, I selected my background patterned paper first and then added color to the stamped image. It's much easier this way - LOL! I stamped the image using Unity Stamp's Loved More stamp set on white cardstock using Memento Tuxedo Black ink. I added color with Copic markers - BG13, C2, RV06, Y02, Y17, YG23. I trimmed the panel to to 2 1/2" x 3 1/4". I cut a mat from teal cardstock at 2 5/8" x 3 3/8" but decided offset the two panels. I stamped the sentiment from the same stamp set on the teal cardstock and trimmed it to 2 3/8" x 7/8". I glued the elements to the A2 background patterned paper and then adhered it to a white A2 card base with double sided tape to complete this card.

I love the sentiment in this stamp set. I plan to make several versions of this card and give them to my friends, especially those who may be struggling right now to remind them that they are loved more than they know. 

I will be choosing two winners randomly from those who leave me a comment on my blog, over my five days as the Growing in Unity Person and will be posting the winners' names on the Facebook - Growing in Unity - Cardmaking/Rubber Stamping group. 

Thanks for stopping by
sue


This site uses cookies from Google to deliver its services and analyze traffic. Your IP address and user-agent are shared with Google along with performance and security metrics to ensure quality of service, generate usage statistics, and to detect and address abuse.

Tuesday 13 June 2023

Addicted to Stamps and More! Challenge #448

Ready for a new challenge at Addicted to Stamps and More! Our next challenge is


Here's my card


For my card, I used Pink and Main's Special Gift background stamp. I stamped it with Versafine Onyx Black ink on a white A2 card panel. I didn't really feel like coloring in all the presents, but I wanted to add some color. I created some 1" circle masks with a 1" circle punch and 3" post-it notes. I used a separate mask for each color. I added color with distress inks - dried marigold, kitsch flaming, salvaged patina, applied with oval ink blending brushes. I trimmed the panel slightly and matted with light teal. Using the same color cardstock, I die cut the sentiment using Impression Obsession's DIE166-F - Happy Birthday. I added Wink of Stella to the die cut to add a bit of shimmer. I adhered the die cut to the stamped panel and the matted panel to a white A2 card base to complete my card.

We'd love to see your birthday creations in our gallery this fortnight.

Thanks for stopping by
sue

This site uses cookies from Google to deliver its services and analyze traffic. Your IP address and user-agent are shared with Google along with performance and security metrics to ensure quality of service, generate usage statistics, and to detect and address abuse.

Atlantic Hearts Sketch Challenge #529

Life has been a bit hectic around here the last few days so I didn't get around to creating this blog post. I'm here now though! It's time for a new challenge at Atlantic Hearts Sketch Challenge. Our sketch this week is


Here's my card


For my card, I rotated the card 90 degrees to the right and rotated the sentiment. I also didn't add any gems or dots because I find them a bit difficult to send through the mail. So a clean and simple interpretation of this week's sketch, it is. I used Scrapbook & Cards Today's Change the World stamp set and die that I received through the Crop & Create Delivered Event - October 2021. I heat embossed the large image with white embossing powder. I then added color with distress inks - kitsch flamingo, carved pumpkin, mustard seed, twisted citron, mermaid lagoon, applied with oval ink blending brushes. I then die cut the image and adhered it to a light gray A2 card base. For the sentiment, I used the leftover ink on the oval ink blending brushes and added color in the same order onto a scrap of white cardstock, so that I could die cut my sentiment. I then die cut the inked cardstock with Simon Says STAMP's Script Thanks die. This is a trick I learned in a class. It's a great way to use extra ink on your oval ink blending brushes but also the colors will match perfectly with your ink blended image. I glued the sentiment to the card to complete my card.

We'd love to see how you're inspired by our sketch. Looking forward to seeing your creations in our gallery.

Thanks for stopping by
sue

This site uses cookies from Google to deliver its services and analyze traffic. Your IP address and user-agent are shared with Google along with performance and security metrics to ensure quality of service, generate usage statistics, and to detect and address abuse.

Growing in Unity 2023 ~ Day 2

Welcome to Day 2. I'm honoured to be the Growing in Unity Person this week. Unity Stamps is an American company, based in Minnesota. They have a vast collection of red rubber stamps, as well as patterned papers, Unity swag, and other crafting supplies. I am grateful to them for giving me this opportunity to showcase some of their products.

Here's my card for Day 2


For this card, I made my own background patterned paper. I heat embossed using the largest stamp from Unity Stamp's Tea Love stamp set on a white A2 card panel. I stamped the image three times and used white embossing powder. To help align the stamping, I used my MISTI tool and moved the paper between impressions and left the stamp in the MISTI, to ensure that the image would line up. I added color with distress inks - kitsch flamingo, salvaged patina, dried marigold lightly and randomly applied with oval ink blending brushes. I trimmed the panel slightly. For the sentiment, I found a scrap of teal cardstock and stamped it with Concord & 9th's Dove ink. I trimmed the teal into a rectangle. I used some dimensional adhesive to pop the sentiment up. I adhered the panel to a white A2 card base to complete my card.

I will be choosing two winners randomly from those who leave me a comment on my blog, over my five days as the Growing in Unity Person and will be posting the winners' names in the Facebook - Growing in Unity - Cardmaking/Rubber Stamping group. 

Thanks for stopping by
sue


This site uses cookies from Google to deliver its services and analyze traffic. Your IP address and user-agent are shared with Google along with performance and security metrics to ensure quality of service, generate usage statistics, and to detect and address abuse.

Monday 12 June 2023

Growing in Unity 2023 ~ Day 1

I'm thrilled to be this week's Growing in Unity 2023 person. Unity Stamps is an American company, based in Minnesota. They have a vast collection of red rubber stamps, as well as patterned papers, Unity swag, and other crafting supplies. I am grateful to them for giving me this opportunity to showcase some of their products.

Here's my card for Day 1


For this card, I started with Unity Stamp's Star & a Bear stamp set. I stamped the cute bear and star on a scrap of white cardstock with Versafine Onyx Black ink in my MISTI tool. I stamped a few times to get a good impression. I fussy cut the little bear. For the star, I used a Gelly Roll Stardust Glitter silver gel pen to color in the star and to give it a bit of sparkle and then I fussy cut it. For the sky, I added color randomly to a piece of white cardstock with distress inks - chipped sapphire, salty ocean, seedless preserves, applied with oval ink blending brushes. I flicked some metallic watercolour paint using Yasutomo Pearlescent Watercolor Set with an acrylic block and a paint brush. When the paint was dry, I die cut using a die from the Sizzix circle die set. I glued the little bear and the star to the sky element. For the sentiment, I heat embossed it with silver embossing powder on a navy blue A2 card panel. The sentiment is part of the same Star & a Bear stamp set. I adhered the dark blue panel to a white A2 card base to complete my card.

I will be choosing two winners randomly from those who leave me a comment on my blog, over my five days as the Growing in Unity Person and will be posting the winners' names in the Facebook - Growing in Unity - Cardmaking/Rubber Stamping group. 

Thanks for stopping by
sue


This site uses cookies from Google to deliver its services and analyze traffic. Your IP address and user-agent are shared with Google along with performance and security metrics to ensure quality of service, generate usage statistics, and to detect and address abuse.

Friday 9 June 2023

Die Cut Divas ~ Critters Challenge with SheepSki Designs

It's getting warm here in the Pacific Northwest. It's a great excuse to stay indoors and sit at my craft table - no, I don't really need an excuse! LOL!.

We have a new challenge at Die Cut Divas. Our challenge this month is

CRITTERS

Our sponsor this month is SheepSki Designs. They will be awarding our winner, three digital images of their choice from their online store. 


Here's my "critter" card


Life looks pretty sweet for this frog, doesn't it? For my card, I used SheepSki Design's My Pad digital image. I sized it and printed it with my inkjet printer. I added color with Copic markers - BG72, G82, R22, R32, Y15, YG03, YG11, YG23. I stamped the sentiment using Waffle Flower's Potted Stamp set and Hero Arts Field Greens ink. I die cut the panel using a Waffle Flower's Additional A2 Layers die. I also die cut a dark teal mat with the next size up die from the Waffle Flower's Additional A2 Layers die set. I adhered the panels together with double sided tape and then to a white A2 card base to complete my card.

We'd love to see your critter creations in our gallery this month. Please remember to include a die cut!

Thanks for stopping by
sue

This site uses cookies from Google to deliver its services and analyze traffic. Your IP address and user-agent are shared with Google along with performance and security metrics to ensure quality of service, generate usage statistics, and to detect and address abuse.

Thursday 8 June 2023

Happy Little Stampers ~ Anything Goes with Dies June Challenge

Hello Crafty Friends! Are you ready for a new challenge at Happy Little Stampers ~ Anything Goes with Dies? Our challenge is always


Here's my card


I had my Simon Says STAMP's Simple Patterns Trio stencils out and grabbed the diagonal stripe one to start my card. Using my Wendy Vecchi's Make Art STAY-tion and a white A2 card panel, I moved the stencil in place, holding it there with the magnets. I added color with distress inks - Kitsch Flamingo, Shaded Lilac, Salvaged Patina, applied with oval ink blending brushes. I removed the inked panel from the Make Art STAY-tion and decided to use the Pink & Main dies that we received as part of the Crop & Create Delivered - March 2023 event box. Michelle from Pink & Main, had us make our colored cardstock by scribbling on scraps of white cardstock with markers. I used Copic markers BG23, BV08, RV06, RV23, V04 Y06. I like the variations in color achieved this way. I die cut the flower parts, hearts and foliage using the Pink & Main dies. I arranged the die cuts in the lower left corner and glued them in place. For the sentiment, I used Simon Says STAMP's Lots of Thanks stamp set and Versafine Onyx Black ink. I adhered the panel to a white A2 card base to complete the card.

We'd love to see your die cut creations in our gallery this month.

Thanks for stopping by
sue

This site uses cookies from Google to deliver its services and analyze traffic. Your IP address and user-agent are shared with Google along with performance and security metrics to ensure quality of service, generate usage statistics, and to detect and address abuse.

Tuesday 6 June 2023

Happy Little Stampers ~ June Stencil Challenge

We have a new challenge starting at Happy Little Stampers ~ Stencil Challenge.


Here's my card


Being Japanese Canadian, I find myself drawn to all things Japanese. For my card, I used Clearly Besotted's Lunar Lanterns stencil on a natural A2 card panel. I added color with Candied Apple distress ink, applied with an oval ink blending brush. My little Japanese girl is stamped using Ellen Hutson's So Matcha stamp set with Memento Tuxedo Black ink. I added color with Copic markers - BV13, E50, R11, R17 and I carefully fussy-cut her out. The sentiment is from Lawn Fawn's Let's Roll stamp set. I glued the little kimono-wearing girl onto the card panel and then adhered it all to a natural A2 card base to complete my card. I wish my mom was still alive - she would have loved this card.

We'd love to see your stencilled cards in our gallery this month.

Thanks for stopping by
sue

This site uses cookies from Google to deliver its services and analyze traffic. Your IP address and user-agent are shared with Google along with performance and security metrics to ensure quality of service, generate usage statistics, and to detect and address abuse.

Try Stampin' On Tuesday ~ Challenge #610

Tuesday! Time for a new challenge at Try Stampin' On Tuesday. Here's our sketch which we hope will inspire you

Optional theme: Masculine


Here's my card


For my masculine birthday card, I used the motorcycle stamp from Unity Stamp's Kit of the Month for June 2018, called We Can Rise. I stamped it with Memento Tuxedo Black ink and added color with Copic markers - BG05, C2, C5, C7. I trimmed the panel to 4 1/2" x 2 5/8". I matted with dark gray cardstock. I added the tire mark using CTMH's Fast and Furious stamp set with Hero Arts Cup O' Joe ink. For the sentiment, I used Clearly Besotted's Many Mini Messages, stamped with Hero Arts Soft Granite ink. I adhered the panel with double-sided tape to a white A2 card base to complete my card.

We'd love to see how you're inspired by our sketch this fortnight. 

Thanks for stopping by
sue

This site uses cookies from Google to deliver its services and analyze traffic. Your IP address and user-agent are shared with Google along with performance and security metrics to ensure quality of service, generate usage statistics, and to detect and address abuse.

Sunday 4 June 2023

Happy Little Stampers ~ June Christmas Challenge

Christmas cards! Is it too soon to start adding to my 2023 Christmas card stash? I say no. It's never too soon because "blink" and it's December. If you'd like to start adding to your stash, join our new challenge at Happy Little Stampers ~ Christmas Challenge. Our new challenge is


Here's my card


My one-layer Christmas card doesn't incorporate the optional theme of "make a scene". I found this Altenew Festive Foliage stamp set really interesting. There are three stamps which together form this Christmas tree. I chose colors that I like. I used Gina K Design's Ocean Mist and Grass Green inks as well as Hero Art's Bubble Gum ink. I really like that the bubble gum stamp forms a heart. It's a fun way to spread some love at Christmas. The sentiment is from Clearly Besotted's  Sentimental Type stamp set, stamped with GKD's Ocean Mist ink. 

Would love to see your Christmas creations in our gallery this month.

Thanks for stopping by
sue


This site uses cookies from Google to deliver its services and analyze traffic. Your IP address and user-agent are shared with Google along with performance and security metrics to ensure quality of service, generate usage statistics, and to detect and address abuse.

Saturday 3 June 2023

Addicted to CAS ~ Challenge #239

Not going to lie, my favorite style is clean and simple. I'm not into multiple layers, lots of dimension and texture. I mean, how do you even mail it? Push me to make a clean and simple card, that's bliss! We have a new challenge at Addicted to Clean and Simple and it's my turn to be the hostess. This is what I chose.


Here's my one layer card


For my card, I started with the polka dot stencil from Simon Says STAMP's Simple Patterns Trio stencil set and a white A2 card  base. I positioned in place using my Wendy Vecchi's Make Art STAY-tion. I added colors using Distress inks - dried marigold, kitcsh flamingo, salvaged patina, applied with oval ink blending brushes. I removed the stencil. I then stamped the floral image and sentiment using Gina K Design's Wild Blossoms stamp set and Versafine onyx black ink. That's my one-layer card!

We'd love to see your one-layer creations in our gallery this fortnight.

Thanks for stopping by
sue

This site uses cookies from Google to deliver its services and analyze traffic. Your IP address and user-agent are shared with Google along with performance and security metrics to ensure quality of service, generate usage statistics, and to detect and address abuse.

Friday 2 June 2023

Happy Little Stampers ~ June Birthday Challenge

Welcome June! It's time for a new monthly challenge at Happy Little Stampers ~ Birthday Challenge

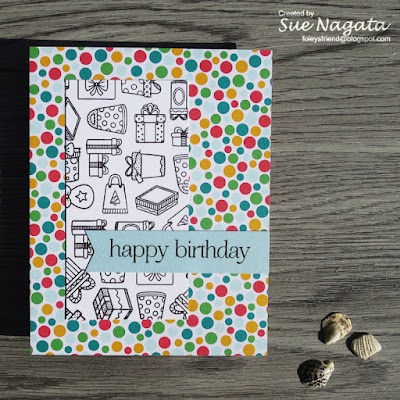
Here's my card


I thought I'd change things up a bit. Instead of stamping an image and coloring it, I decided to stamp and image and leave it black ink on white cardstock. I added color with cardstock and patterned paper. For my card, I stamped on white cardstock using Pink and Main's Special Gift background stamp. I trimmed the panel to 2 1/4" x 4 1/4". I chose the background patterned paper from an old Stampin' Up 6x6 paper pack called Cherry On Top. It felt festive and fun! For the sentiment, I used Papertrey Ink's Keep It Simple: Birthday Stamp set, stamped on light teal cardstock and trimmed to a fishtail banner. I glued the pieces down and adhered the panel to a white A2 cardbase to complete my birthday card.

We'd love to see your birthday card creations in our gallery this month.

Thanks for stopping by
sue

This site uses cookies from Google to deliver its services and analyze traffic. Your IP address and user-agent are shared with Google along with performance and security metrics to ensure quality of service, generate usage statistics, and to detect and address abuse.