Monday 28 February 2022

Happy Little Stampers ~ Watercolour Challenge March 2022

WOW! It's already a new month. That must mean that it's time for a new challenge at Happy Little Stampers ~ Watercolour Challenge
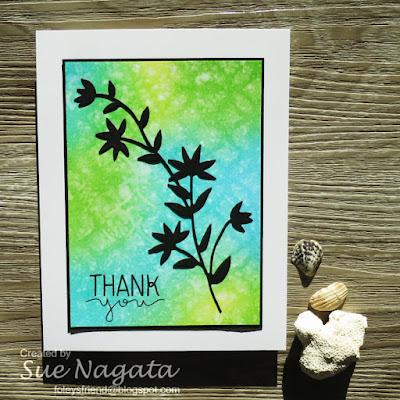
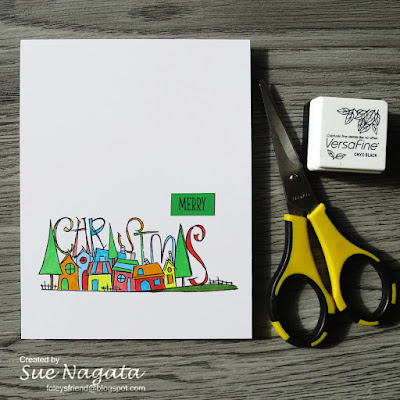

Here's my card


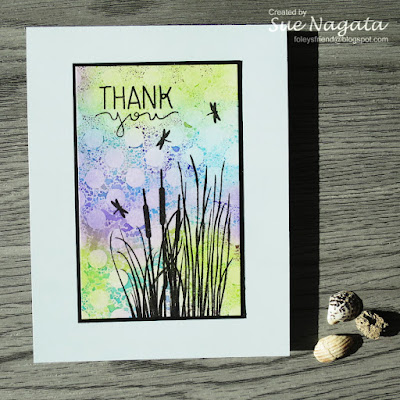
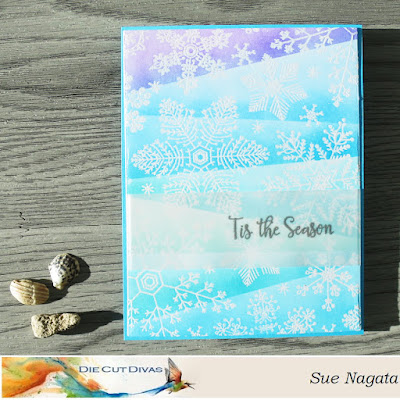
For this card, I started by ink blending on a panel of white 96 lb bristol, with twisted citron, peacock feathers, wilted violet and salty ocean distress inks applied with oval ink blending brushes. I then took my Wendy Vecchi's Polka Dotty stencil and lightly spritzed it with water. Then, I applied the stencil to the inked panel, wet side down. I then carefully lifted the stencil and let the panel dry. Next, I stamped the silhouettes using Technique Tuesday's Growing Wild and Wildflowers stamp sets with Versafine Onyx Black ink. The sentiment is from Simon Says STAMP's Lots of Thanks stamp set. I trimmed the panel to 2 5/8" x 4 1/8" and matted it with black cardstock. I adhered this to a light teal A2 card panel which was adhered to a white A2 card base to complete the card.

We'd love to see you watercolour creations or creations where you've used water!

Thanks for stopping by
sue

This site uses cookies from Google to deliver its services and analyze traffic. Your IP address and user-agent are shared with Google along with performance and security metrics to ensure quality of service, generate usage statistics, and to detect and address abuse.

Die Cut Divas ~ February Challenge ~ It's Snowing

It's the last day of our February Challenge at Die Cut Divas. Our challenge is 

ANGLE IT

Our sponsor this month is Hero Arts. They will be giving our winner a $25 gift card to their website.


Here's my card


For my card, I started by heat embossing with white embossing powder the Hero Arts Hand Drawn Snowflakes Bold Cling Stamp on a white A2 card panel. I used distress inks (cracked pistachio, peacock feathers, salty ocean, mermaid lagoon, wilted violet) applied with oval blender brushes. To achieve the "ANGLE"d look, I used printer paper, held at various angles to act as a mask. I added each strip individually, placing the printer paper at a different angle from the previous, until I reached the top. I didn't really want to cover up my work, so for the sentiment, I used a strip of vellum and heat embossed with silver the sentiment from Hero Arts Winter Silhouettes stamp set. I trimmed the panel with Waffle Flower's Additional A2 Layers die and then adhered it to a teal A2 card panel which I adhered to a white A2 card base to complete my card.

It's the last day of our ANGLE IT challenge. If you have time, please join us. 

Thanks for stopping by
sue

This site uses cookies from Google to deliver its services and analyze traffic. Your IP address and user-agent are shared with Google along with performance and security metrics to ensure quality of service, generate usage statistics, and to detect and address abuse.

Tuesday 22 February 2022

Try Stampin' On Tuesday ~ Challenge #544

It's Tuesday and time for a new challenge at Try Stampin' On Tuesday. Here is this week's sketch.

Optional Theme: Watercolor

Here's my card


For my card, I rotated the sketch 90 degrees and chose to add in the optional theme of watercolor to my card. I was playing with my Gansai Tambi 18 color large pan set of watercolors the other day and created a few background panels using 140 lb Strathmore watercolor paper. This was one of the panels I made. I used a lot of water and little blobs of color. I wanted a very muted and subtle background panel. For the circles, I used scraps of blue cardstock and Sizzix circle dies, my Stampin' Up 3/4" circle punch and my EK Success 3/8" circle punch. For the leaves, believe it or not, I didn't have a die so I "freehand" cut a couple of leaves from a scrap of green cardstock. For the sentiment, I used Hero Arts Year Round Sentiments stamp set and Versafine Onyx Black ink. I trimmed the watercolor panel slightly and matted on a medium gray panel that matched the horizontal banner color. 

We'd love to see how you're inspired by our sketch.

Thanks for stopping by
sue

This site uses cookies from Google to deliver its services and analyze traffic. Your IP address and user-agent are shared with Google along with performance and security metrics to ensure quality of service, generate usage statistics, and to detect and address abuse.

Monday 21 February 2022

Atlantic Hearts Sketch Challenge #461 Arigato

Happy Monday and in BC, it's Family Day. So, it's a day off for most people. And, it's sunny today! Perfect day to craft. It's time for a new challenge at Atlantic Hearts Sketch Challenge. Here's the sketch


Here's my card


I recently purchased Clearly Besotted's My Bam-boo stencil and I just had to give it a go. I inked it up with mowed lawn and peeled paint distress inks applied with an oval blending brush. I die cut it with a Sizzix circle die. I looked through my stash of patterned papers until I found one that I liked for the background. I found a couple of strips of cardstock for the other elements of my card. For the sentiment, I used Mama Elephant's Tiny Ninjas stamp set and Versafine Onyx Black ink. 

We'd love to see how you're inspired by this week's sketch.

Thanks for stopping by
sue

This site uses cookies from Google to deliver its services and analyze traffic. Your IP address and user-agent are shared with Google along with performance and security metrics to ensure quality of service, generate usage statistics, and to detect and address abuse.

Saturday 19 February 2022

Addicted to CAS ~ Challenge #214

Hello Crafty Friends! Are you enjoying the longer days? I certainly am and I'm so happy to see some crocus and snowdrop flowers. It must mean that Spring is close-by, right? Hoping that things like low temperatures and snow are over for the season. One can hope, right? 

It's time for a new challenge at Addicted to CAS


Well, OK then! I can handle this kind of snowflake - LOL! Here's my card


I was fortunate enough to participate in the Crop & Create Delivered Cardmaking Event last October. As part of the event, we received the Lawn Fawn Frosties stamp set. It had been retired but was brought out of retirement for the event. I feel so lucky to have received it. This card is similar to the cards we created during the event. For my card, I started with a 2.75" x 4.25" white cardstock panel. Using Lawn Fawn's Sugarplum ink, I stamped the trio of snowflakes stamp along the edge of the cardstock, using an acrylic block so that it was easier to change the orientation of the stamp. I then used an oval brush to ink blend Sugarplum ink along the edge of the panel. Next, I used a 2" x 3.5" white cardstock panel. I stamped the corner flourish on opposite corners with Lawn Fawn Peacock ink. I added the sentiment, stamped with the Sugarplum ink. I ink blended with the Peacock ink and an oval brush along the edges of the panel. I adhered the sugarplum panel to a light teal A2 card panel and then the peacock panel to it. To complete the card, I adhered the A2 panel to a white A2 card base.

We'd love to see your snowflake creations.

Thanks for stopping by
sue

This site uses cookies from Google to deliver its services and analyze traffic. Your IP address and user-agent are shared with Google along with performance and security metrics to ensure quality of service, generate usage statistics, and to detect and address abuse.

Tuesday 15 February 2022

Addicted to Stamps and More! Challenge #423

Are you ready for a new challenge at Addicted to Stamps and More!? The challenge is


I had a friend celebrating their birthday so I made a card for them. Here's the card


This friend used to have a '66 Mustang coupe. So this stamp from Unity Stamps All Cylinders stamp set was just perfect. I stamped the car with Memento Tuxedo Black ink on a white A2 card panel. I added color using Copic markers C3, E08, E41 trying to mimic the Ford Mustang emberglo body color and parchment interior color. I stamped the sentiment from the same stamp set in the lower right corner. I trimmed the panel down slightly to add a black mat and then have a thin white border, once adhered to a white A2 card base. He seemed happy with the card!

We'd love to see your birthday cards creations.

Thanks for stopping by
sue

This site uses cookies from Google to deliver its services and analyze traffic. Your IP address and user-agent are shared with Google along with performance and security metrics to ensure quality of service, generate usage statistics, and to detect and address abuse.

Monday 14 February 2022

Perfectly CAS ~ February Challenge

Hello Crafty Friends! How has February been treating you? It's halfway done. I hope that Spring is just around the corner. It's time for a new challenge at Perfectly CAS. For us, Perfectly CAS means covering up to one third of your card. Our challenge is


Here's my card


The "metallic" I chose was gold cardstock. I started by embossing a 1.25" x 4.25" strip of gold cardstock with Provocraft Cuttlebug's Forest Branches embossing folder. I matted the strip with black cardstock and then the same gold cardstock. I chose to use a black A2 card panel as my background. I die cut the branch using Simon Says STAMP's Eucalyptus Leaves die and the same gold cardstock. I heat embossed the sentiment from Clearly Besotted's A Little Sentimental stamp set and gold embossing powder on black cardstock, which I trimmed down to a thin strip. To complete the card, I adhered the black panel to a white A2 card base.

We'd love to see your metallic creations. Please remember to cover no more than one-third of your card panel.

Thanks for stopping by
sue

This site uses cookies from Google to deliver its services and analyze traffic. Your IP address and user-agent are shared with Google along with performance and security metrics to ensure quality of service, generate usage statistics, and to detect and address abuse.

Wednesday 9 February 2022

Die Cut Divas ~ February Challenge

It's a new month so there must be a new challenge at Die Cut Divas. The challenge is this month is

ANGLE IT

Our sponsor this month is Hero Arts. They will be giving our winner a $25 gift card to their website.


I wondered what to do for an "ANGLE IT" challenge. I decided on a Double Gate Fold Card as the front panel is "angled". Here's my card


I started with a piece of double sided tone on tone patterned paper that was 5.5" x 12". I scored the paper - mountain fold at 2" and 10" and valley fold at 4" and 8". I cut a triangle piece from both left and right edges that measured 2" across (to the fold) and 2.75" down. I flipped the triangles and adhered them to the bottom left and right of the front facing panels. For the main focal image, I stamped using Hero Arts Party Fox Stamp & Cut set with Memento Tuxedo Black ink. I added color with Copic markers - B02, E02, E08, R11, YG06. I used a Sizzix circle die to die cut the fox. For the sentiment, I stamped it using Hero Arts Just Rust ink and trimmed it to a thin sentiment strip. When adhering the circle and sentiment, I had to remember to only adhere it to the left side of the card (or else the card wouldn't open - LOL!).

I tried to take a photo of the card opened out. It wasn't too successful (we don't get to see much sun at this time of year) but here it is


We'd love to see how you "angle it". Please remember to include at least one die cut because well, we are Die Cut Divas.

Thanks for stopping by
sue

This site uses cookies from Google to deliver its services and analyze traffic. Your IP address and user-agent are shared with Google along with performance and security metrics to ensure quality of service, generate usage statistics, and to detect and address abuse.

Tuesday 8 February 2022

Try Stampin' On Tuesday ~ Challenge #542

It's time for a new challenge at Try Stampin' On Tuesday.


It's not too early to start on Christmas cards, is it? Here's my card


Last November, I took part in Concord & 9th's Holly Jolly Holiday (virtual) workshop. As part of the workshop, we received a kit including stamp sets, die sets and inks. The stamp set included a thick stripe stamp, which I stamped with Concord & 9th's Grapefruit ink from our kit. I then used a die, also from our kit to die cut the stocking. I used Spellbinder's Scalloped circle die to die cut the scalloped circle from light olive cardstock. I stamped the sentiment using Hero Arts Holiday Ornaments Stamp & Cut set onto a scrap of red cardstock that I cut into a fish tail banner. I found some other scraps of printed paper, which I also cut into fish tail banners. I adhered all the elements onto a light gray A2 card base to complete the card. 

We'd love to see how you're inspired by our sketch.

Thanks for stopping by
sue

This site uses cookies from Google to deliver its services and analyze traffic. Your IP address and user-agent are shared with Google along with performance and security metrics to ensure quality of service, generate usage statistics, and to detect and address abuse.

Monday 7 February 2022

Atlantic Hearts Sketch Challenge #459

Happy Monday! It's time for a new challenge at Atlantic Hearts Sketch Challenge

Here's my card


When I saw the sketch, I knew that I wanted to use some bright colors. The weather has been pretty dreary here and I wanted to spice things up a bit. I started with a panel of white cardstock that measured 3 3/8" x 8 3/8" which is 1/8" shorter on each dimension than a regular slimline card. I knew that I wanted to mat with black cardstock that measured 3.5" x 8.5". I made three 2 1/4" square mats from post-it notes using a My Favorite Things Stitched Square STAX die. I positioned the middle mat and inked up the square using fossilized amber and mowed lawn distress inks, applied with an oval brush. I removed that mat and positioned the top mat and applied carved pumpkin and fired brick distress ink. Lastly, I removed that mat and positioned the final mat and applied salty ocean and wilted violet distress ink. I removed the mask. I then stamped the floral image using Gina K Designs Friendly Silhouettes and Versafine Onyx Black ink in the top and bottom square. In the middle square, I stamped the sentiment using a stamp from Simon Says STAMP's Furry Cat & Box 3x4 stamp set and Versafine Onyx Black ink. To complete the card, I adhered the panel to the black cardstock, which I then adhered to a white card base.

We'd love to see how you are inspired by this week's sketch.

Thanks for stopping by

sue

This site uses cookies from Google to deliver its services and analyze traffic. Your IP address and user-agent are shared with Google along with performance and security metrics to ensure quality of service, generate usage statistics, and to detect and address abuse.

Sunday 6 February 2022

Happy Little Stamper ~ Stencil Challenge

Do you like working with stencils? I do for a couple of reasons. They are available at an affordable price (unless of course, you're purchasing layering stencils), are relatively easy to work with, they are easy to store (take up very little space) and sometimes makes it look like you have exceptional crafty/artsy skills. If you have stencils, we'd love for you to use one (or multiples) and join us at Happy Little Stampers ~ Stencil Challenge.


Here's my card


For this card, I inked up an A2 panel of 96 lb bristol with twisted citron, mowed lawn and peacock feathers distress ink, applied with an oval brush. I then placed Tim Holtz' Latticeworks Layering Stencil on top and spritzed the panel with water. The places where the stencil was, protected the inked panel while the open spaces were "faded" with the addition of water. I picked up any additional water droplets with some paper towel. I trimmed the panel down and matted with black cardstock. I also die cut the foliage with Penny Black's Flower Frolic die from black cardstock. For the sentiment, I used Simon Says STAMP's Lots of Thanks stamp set with Versafine Onyx Black. I adhered the panel to a white A2 card base to complete the card.

We'd love to see your projects using stencils. 

Thanks for stopping by
sue

This site uses cookies from Google to deliver its services and analyze traffic. Your IP address and user-agent are shared with Google along with performance and security metrics to ensure quality of service, generate usage statistics, and to detect and address abuse.

Saturday 5 February 2022

Addicted to CAS ~ Challenge #213

Hi Friends! How are you doing? I'm glad that they days are getting longer. It's nice to have some daylight in the evening. It's time for a new challenge at Addicted to CAS.


Here's my card


Sorry about the poor quality of my photo. I haven't yet quite figured out how to best photograph shiny papers. For my card, I used Simon Says STAMP's Heart Parade die. I die cut the hearts and pieces of hearts using a 6x6 paper pack - Foil Paper Pack (valentine inspired). I didn't use the outline of hearts but rather just assembled the hearts and pieces of hearts, as if a black outline was in place. Here's a close-up.


For the sentiment, I used gold embossing powder and Simon Says STAMP's Handwritten Sentiments stamp set.

As Valentine's Day is just around the corner, maybe you have a "heart" inspired card idea. We'd love for you to join our challenge.

Thanks for stopping by
sue

This site uses cookies from Google to deliver its services and analyze traffic. Your IP address and user-agent are shared with Google along with performance and security metrics to ensure quality of service, generate usage statistics, and to detect and address abuse.

Friday 4 February 2022

Happy Little Stampers ~ Christmas Challenge

Hello Crafty Friends! It's time for a new challenge at Happy Little Stampers ~ Christmas Challenge. Our challenge for February is


Here's my card


This was the Christmas card that I mailed out to my friends. Hopefully they've all been received so I'm not spoiling any surprise! I started with an A2 panel of 140 lb Strathmore watercolor paper. I stamped the ornament image with Versafine Onyx Black ink using Polkadoodles Baubles and Banners stamp set. I added the sentiment using Polkadoodles Heartfelt Joy stamp set and Versafine Onyx Black ink. I made thirty of these cards, so I used my MISTI and stamped assembly-line style. I used my Michaels' Artist's Loft Watercolor Pan set with a fine paint brush and some water to add colors to the heart, circles and stars around the ornament. For a little bit of shimmer, I used Yasutomo Pearlescent Watercolor Pan Set to add the silver pearlescent paint to the ornament top and bottom. I also used a silver gel pen to fill in the blank spaces of the CHRISTMAS letters. The ornament looked too plain, so I traced the shape of the ornament onto some scrap printer paper and cut it out. I used this as a mask and added salty ocean distress ink, applied with an oval brush to fill in the ornament. To complete the panel, I used a ruler and thin black marker to add the string from which the ornament hangs. Finally, I adhered the panel to a white A2 card base and the card was ready to send.

We'd love to see your Christmas card creations.

Thanks for stopping by
sue

This site uses cookies from Google to deliver its services and analyze traffic. Your IP address and user-agent are shared with Google along with performance and security metrics to ensure quality of service, generate usage statistics, and to detect and address abuse.

Tuesday 1 February 2022

Addicted to Stamps and More! Challenge #422

Hoping the link from Addicted to Stamps and More! works. Blogger has been playing around for some time and links don't always work. I mean, I'm grateful that I can blog in advance and not "live" but please don't mess with the links!

We have a new challenge at Addicted to Stamps and More!


It's not too early to get started on next year's Christmas cards or are you still working on Christmas 2021 cards. No judgement here! Been there; done that. Honestly, I have so many Christmas themed crafting supplies, I likely can keep crafting Christmas cards and not repeat the stamp set or die. Anyway, enough chatting! Here's my card


For this card, I used Polkadoodles Christmas scene stamp set. I stamped the image with Memento Tuxedo Black ink and added lots of bright colors with Copic markers - B12, BG05, C3, E25, R17, R22, Y06, Y38, YG09, YG67. For the "MERRY", I used Clearly Besotted's Many Mini Messages. I covered the word "CHRISTMAS" with some masking tape while I inked up the sentiment and removed the masking tape (don't forget this step!) before stamping on a scrap of green cardstock. I trimmed the sentiment down and adhered it to the A2 card panel. 

We'd love to see your Christmas creations.

Thanks for stopping by
sue

This site uses cookies from Google to deliver its services and analyze traffic. Your IP address and user-agent are shared with Google along with performance and security metrics to ensure quality of service, generate usage statistics, and to detect and address abuse.