Tuesday 31 October 2023

Happy Little Stampers ~ November Watercolour Challenge

Wait ... November, really? Wow, this year has been flying by. I guess it's time for a new challenge at Happly Little Stampers ~ Watercolour Challenge
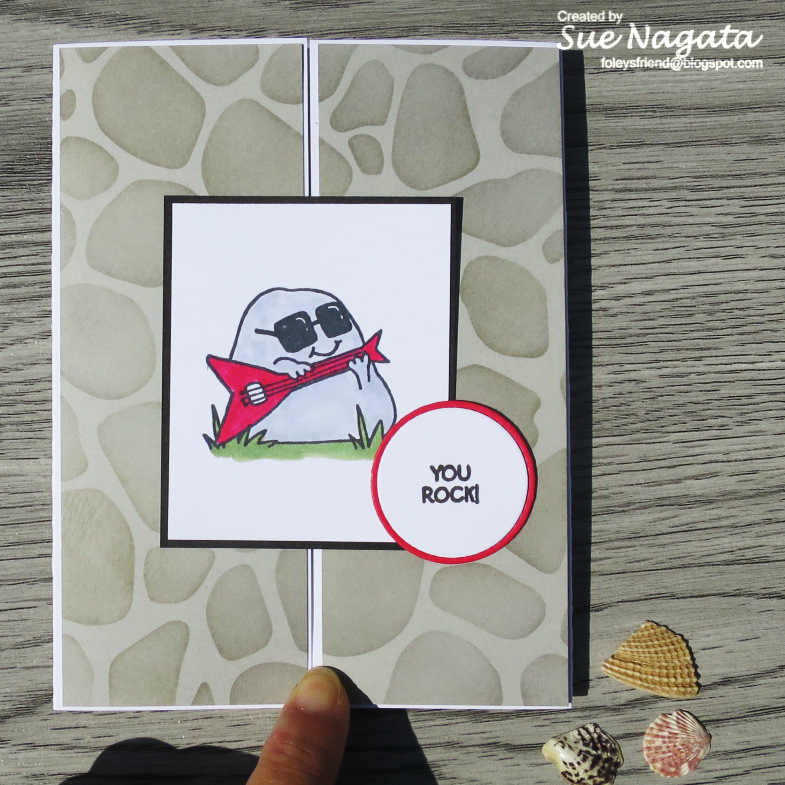

Here's my card


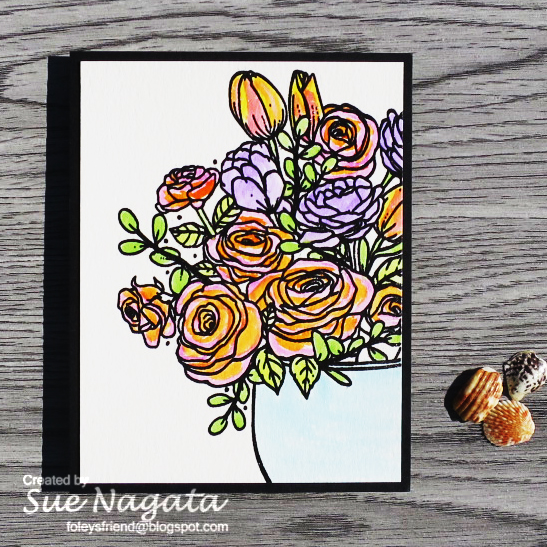
For my card, I used Scrapbook & Cards Today's Beautiful You stamp set which I received as part of Crop & Create Delivered March 2022 event. I stamped it with Versafine Onyx Black ink on 140 lb Strathmore watercolor paper and then heat embossed with clear embossing powder. Optional theme of Emboss - done! I added colour with a paint brush, some water and distress inks - wilted violet, picked raspberry, twisted citron, mowed lawn, mustard seed, carved pumpkin, tumbled glass, abandoned coral. I smooshed ink from the cube onto a plastic place mat and picked up the ink with a wet paint brush. Having a heat embossed image, helped to contain the ink and water to specific areas without mixing. I couldn't figure out what sentiment to use, nor where to put the sentiment, so I left it, as is. I did trim in down slightly and matted with a black A2 card panel to frame it. I adhered the panel to a white card base to complete my card.

We'd love to see your watercolour creations in our gallery this month.

Thanks for stopping by
sue

This site uses cookies from Google to deliver its services and analyze traffic. Your IP address and user-agent are shared with Google along with performance and security metrics to ensure quality of service, generate usage statistics, and to detect and address abuse. 

Last Day at Die Cut Divas with Birch Press Designs

It's the last day of the October challenge at Die Cut Divas. We are sponsored this month by Birch Press Design. They will be giving our winner a $20 gift card to their online store and our October challenge is 

USE A LAYER DIE SET or LAYER A DIE CUT ON ANOTHER DIE CUT


Here's my card


For my card, I used Birch Press Design's Pimpernel Contour Layers dies with scraps of blue/teal, yellow and green cardstock. I glued the pieces together to create the flowers and leaves. I used the same teal cardstock with Birch Press Design's Hello Sugar Script die to create the sentiment. I glued the sentiment and flower and leaves to a natural A2 card base to complete the card.

You have time to create a card and join us in the gallery. The challenge will end at 9pm Pacific.

Thanks for stopping by
sue

This site uses cookies from Google to deliver its services and analyze traffic. Your IP address and user-agent are shared with Google along with performance and security metrics to ensure quality of service, generate usage statistics, and to detect and address abuse. 

Monday 30 October 2023

Atlantic Hearts Sketch Challenge #549

How is your Monday going? I haven't been feeling well for a few days and almost as a "joke", I thought I'd test myself for COVID. What do you know? I tested positive. I felt that I had been careful but clearly not careful enough. I'm feeling much better today and hopefully I'll be back to myself soon. Guess, it gives me lots of extra time at my craft table. Talking about craft tables, it's time for a new challenge at Atlantic Hearts Sketch Challenge. Here's our sketch for the next two weeks


Here's my card


For my card, I made a gate fold card (which wouldn't stay closed and that's why my finger is in the photo - LOL!). For the two side panels, I used Heffy Doodle's Stoney Maloney stencil and a light gray A2 card panel. I added hickory smoke and pumice stone distress ink, applied with oval ink blending brushes through the stencil. I cut the A2 panel into two 5 3/8" x 2" strips. For the center panel, I stamped this cool dude using Gerda Steiner Designs You Rock stamp set and Memento Tuxedo Black ink. I added color with Copic markers C2, C3, RV29, YG63. I trimmed the panel to 2 3/4" x 2 1/4" and matted with black cardstock. For the sentiment, I used the same stamp set, stamped on a scrap of white cardstock and die cut using a Sizzix circle die. To help make it pop, I matted with a red circle, die cut using a die from My Favorite Things' Stitched Circle STAX die-namics. 

I scored a white 8.5" x 5.5" piece of 100 lb cardstock at 2 1/8" from both sides. I adhered both side panels and remembered to adhere the center panel to only one side (otherwise, it would be pretty difficult to open the card). Here's a photo of it partially opened.


We'd love to see how you've been inspired by our sketch. Please upload your cards in our gallery.

Thanks for stopping by
sue


This site uses cookies from Google to deliver its services and analyze traffic. Your IP address and user-agent are shared with Google along with performance and security metrics to ensure quality of service, generate usage statistics, and to detect and address abuse. 

Tuesday 24 October 2023

Try Stampin' On Tuesday ~ Challenge #630

How are you doing? Hope you're finding time to craft. There is very little that makes me feel better than playing with paper at my craft table. We have a new challenge at Try Stampin' On Tuesday that we hope will inspire you.

Optional Theme: Warm Drinks

Here's my card


I was able incorporate the optional theme of Warm Drinks onto my card. I started with the little coffee cup using Create-A-Smile's Coffee First stamp set. I stamped the coffee cup with Memento Tuxedo Black ink onto white cardstock and added color with Copic markers - 100,  YG91. I die cut the white cardstock with a My Favorite Things' Stitched Square STAX die-namics die. To add the patterned paper coffee cup sleeve, I stamped the image onto the patterned paper and fussy cut it. I stamped the heart onto a scrap of white cardstock with Memento Tuxedo Black ink ,added color with Copic marker R29 and fussy cut it. I glued the coffee cup sleeve and the heart in place. For the background, I started with some natural cardstock and Tim Holtz Collection/Stampers' Anonymous Layer Stencil Mini #3 (don't know where my regular sized stencil is - LOL!). I added color with the stencils and gathered twigs and ground espresso distress inks, applied with oval ink blending brushes. I moved the stencil around to add the splatters and coffee rings on the natural cardstock. I trimmed it down and cut the curve with Creative Memories' Jumbo Circle custom cutting system and the red blade. I stamped the sentiment using STAMPlorations' Hello, Coffee stamp set on some light teal cardstock and die cut it with a Sizzix circle die. I trimmed it to reflect the element on the sketch. I glued the pieces onto a kraft A2 card panel which was then adhered to a white A2 card base to complete my card. 

We'd love to see how you're inspired by our sketch. Please add your creations to our gallery.

Thanks for stopping by
sue

This site uses cookies from Google to deliver its services and analyze traffic. Your IP address and user-agent are shared with Google along with performance and security metrics to ensure quality of service, generate usage statistics, and to detect and address abuse. 

Saturday 21 October 2023

Addicted to CAS ~ Challenge #249

For me, there is something very calming about clean and simple cards. Making clean and simple cards for me is relaxing. None of the fancy layered die cuts and embellishments for me. If you're like me or like to try different styles, we have a new challenge at Addicted to CAS that you might be interested in. 


Yes, I know. These colors lend themselves very nicely to Halloween cards. I chose something different. Here's my card


I made a one-layer card - the ultimate clean and simple style, right? I started with a white A2 card base, Pink & Main's Mask It Circle and Wendy Vecchi's Make Art STAY-tion. I added color with distress inks (wilted violet and mowed lawn) with oval ink blending brushes. You can see where the colors overlapped that they "created" brown - oops! Before removing the mask/stencil, I stamped the grass and dragonflies using Technique Tuesday's Wildflowers and Growing Wild stamp sets with Versafine Onyx Black ink. I carefully removed the mask/stencil and washed them, before the permanent ink dried. The sentiment uses Clearly Besotted's A Little Sentimental stamp set, again with Versafine Onyx Black ink. That's it! A clean and simple card for you today.

We'd love for you to join us this fortnight with your black, purple and green creations.

Thanks for stopping by
sue

This site uses cookies from Google to deliver its services and analyze traffic. Your IP address and user-agent are shared with Google along with performance and security metrics to ensure quality of service, generate usage statistics, and to detect and address abuse. 

Tuesday 17 October 2023

Addicted to Stamps and More! Challenge #456

Hello! We have a new challenge for you at Addicted to Stamps and More! Our challenge this fortnight is


Here's my card where I "made my mark"


For my one-layer card, I started with Pink & Main's Mask It Circle positioned over a white A2 card base with my Make-Art STAY-tion. I added color with Mowed Lawn and Peacock Feathers distress inks, applied with an oval ink blending brush. I stamped the silhouettes using Penny Black's Flower Sparks stamp set. I stamped two blooms with the mask in place and the other two blooms after I removed the mask. The sentiment is from the same stamp set. 

We'd love to see your creations where you "made your mark" in our gallery this fortnight.

Thanks for stopping by
sue

This site uses cookies from Google to deliver its services and analyze traffic. Your IP address and user-agent are shared with Google along with performance and security metrics to ensure quality of service, generate usage statistics, and to detect and address abuse. 

Monday 16 October 2023

Atlantic Hearts Sketch Challenge #547

Happy Monday! It's time for a new challenge at Atlantic Hearts Sketch Challenge. Here's our sketch


Here's my card


I chose a more masculine color palette. No, I didn't cut each strip individually! I used Scrapbook.com's Slim Strips Slimline dies. I die cut a bunch of 1/4" strips from various pieces of cardstock. I felt that they showed up best on black. So, I started with a black A2 card panel and adhered the strips altering their position in the vertical sense but keeping them in "order" horizontally. For the sentiment, I used MFT's Happy die-namics die and Clearly Besotted's A Little Sentimental stamp set. I adhered the black panel to a white A2 card base to complete my card.

We'd love to see your interpretation of our sketch in the gallery.

Thanks for stopping by
sue

This site uses cookies from Google to deliver its services and analyze traffic. Your IP address and user-agent are shared with Google along with performance and security metrics to ensure quality of service, generate usage statistics, and to detect and address abuse. 

Tuesday 10 October 2023

Try Stampin' On Tuesday ~ Challenge #628

Here I am, going along with my daily things, totally oblivious that it's Monday and not Sunday. That's what happens when here in Canada, it's Thanksgiving. That means that I'm a bit behind schedule. I typically like to have my blog posts written a couple days in advance so I'm not scrambling - like I am now! LOL!

It's time for a new challenge at Try Stampin' On Tuesday


Here's my card


For my card, I started with Your Next Stamp's Autumn Harvest stamp set. I stamped this image with the bunnies and pumpkins with Memento Tuxedo Black ink. I then added color with Copic markers - BG23, E25, E33, RV21, Y38, YR04. I then die cut the image with a Sizzix circle die. I found some patterned papers that went with my color scheme and cut them using the sketch as a guide. For the sentiment, I used Paper Smooches Many Thanks stamp set and stamped with Hero Arts Cup O' Joe ink onto a strip of natural cardstock. I adhered all the elements onto a natural A2 card base to complete my card.

We'd love to see what you create with our challenge this fortnight in our gallery.

Thanks for stopping by
sue

This site uses cookies from Google to deliver its services and analyze traffic. Your IP address and user-agent are shared with Google along with performance and security metrics to ensure quality of service, generate usage statistics, and to detect and address abuse. 

Monday 9 October 2023

Die Cut Divas ~ Layering with Birch Press Design

This month, Die Cut Divas is being sponsored by Birch Press Design who will be giving our winner a $20 gift card to their online store. We thank Birch Press Design for their generosity.


Our challenge this month is 

USE A LAYER DIE SET OR LAYER A DIE CUT ON ANOTHER DIE CUT

Here's my card


For my card, I used Birch Press Design's Dainty Rose and Leaves Contour Layers craft dies. I die cut the pieces using scraps of cardstock from my stash. I adhered the layers of flowers and leaves together. Then, I arranged them on a natural A2 card base and glued them in place. For a sentiment, I used Papertrey Ink's Keep It Simple: Thank You stamp set which I heat embossed with gold powder. 

We love to see your layered creations in our gallery this month.

Thanks for stopping by

sue


This site uses cookies from Google to deliver its services and analyze traffic. Your IP address and user-agent are shared with Google along with performance and security metrics to ensure quality of service, generate usage statistics, and to detect and address abuse. 

Sunday 8 October 2023

Happy Little Stampers ~ October Anything Goes With Dies Challenge

Time for a new challenge at Happy Little Stampers ~ Anything Goes With Dies.


Here's my card


For my card, I used Crop & Create Delivered March 2021 Virtual Card Class Etched Metal dies that were exclusive (at that time) to the kit. I used the dies with scraps of cardstock, obviously in rainbow color order to create my rainbow. Also part of the dies, were the clouds. I cut three. For the sentiment, I used Paper Smooches Word Salad stamp set and PinkFresh Studio's Ocean Breeze ink. To make the gluing of the rainbow pieces easier, I arranged them on my work surface. Then, I used some Press N Seal to hold the pieces in place. I added glue to the reverse side and glued them in place on the card panel. I was able to slide a couple of clouds behind, before the glue set. I adhered the light blue A2 card panel to a white A2 card base to complete the card. 

We'd love to see your die cut creations in our gallery this month.

Thanks for stopping by
sue

This site uses cookies from Google to deliver its services and analyze traffic. Your IP address and user-agent are shared with Google along with performance and security metrics to ensure quality of service, generate usage statistics, and to detect and address abuse.

Saturday 7 October 2023

World Cardmaking Day 2023

Happy Cardmaking Day friends! I hope you're finding time to sit at your craft table and make a card (or more cards). There are a couple of challenges I found today.

Kat Scrappiness is hosting a challenge. The challenge is as simple as 1 - 2 - 3!

1 - (or more) stamped sentiment(s)

2 - (or more) die cut pieces

3 - (or more) pieces of patterned paper

Here's my card


For my card, I used Kat Scrappiness' Layered Tulip Bouquet Die Set. For the die cuts, I used three different patterned papers. In this case, the patterned paper adds some interest and illusion of texture. The sentiment uses Simon Says STAMP's Life is a Journey and Versafine Onyx Black ink. I stamped the sentiment on white cardstock and cut it into a double fishtail banner. I chose to glue the pieces to a cream A2 card base to complete my card.

For the challenge at Uniko on Facebook, I made this card. They also had three criteria - use a Uniko product, share it in the Facebook group and have fun.


For this card, I used Uniko's Christmas Pop Trio stencil. I masked off the other trees and used pieces of post-it notes to separate the colors. I used distress inks (peacock feathers, mowed lawn, mustard seed, carved pumpkin, candied apple, picked raspberry, wilted violet) applied with ink blending tools. For the sentiment, I used Clearly Besotted's Sentimental Type and gold embossing powder. 

Thanks for stopping by
sue

This site uses cookies from Google to deliver its services and analyze traffic. Your IP address and user-agent are shared with Google along with performance and security metrics to ensure quality of service, generate usage statistics, and to detect and address abuse.

Addicted to CAS ~ Challenge #248

Are you ready for a new challenge at Addicted to CAS? Here's our next challenge


Here's my "dies only" card


Actually, for this card, I only used one die, Simon Says STAMP's Heart of Roses die. For the "insides", I randomly scribbled on some 96 lb bristol with Zig Clean Color Real Brush markers - Red, Peach Pink, Pink, Orange and then spritzed with water. I let the colors blend and repeated the process until I was happy with the colors. I then die cut the bristol panel and well as from some dark gray cardstock. I adhered the gray outline to a white A2 cardbase and then carefully glued in all the inlaid die pieces. I decided not to add a sentiment for now. Perhaps, before I send it, I may add a sentiment. I like how this inlaid die cut card turned out.

We'd love to see how you're inspired by "dies only" and would love to see your card creations in our gallery this fortnight.

Thanks for stopping by
sue

This site uses cookies from Google to deliver its services and analyze traffic. Your IP address and user-agent are shared with Google along with performance and security metrics to ensure quality of service, generate usage statistics, and to detect and address abuse.

Friday 6 October 2023

AAA Cards ~ Challenge #250

I love spending time at my crafting table with my music playing. I really don't think there is a place I'd rather be. I just love playing with paper. I tell people that I haven't moved from Kindergarten when I started playing the paper, scissors and glue. Not much has changed - LOL!

There is a challenge at AAA Cards that I wanted to join. Also, they are holding a design team call and am putting my name into the mix. Here is the challenge


Here's my card


For my card, I used Simon Says STAMP's Layered Dots stencils. I used post-it tape to separate a circle and added color with distress inks with oval ink blending brushes. I used three colors for each circle and I somewhat randomly arranged the circles. The distress ink colors I used were Blueprint Sketch, Mowed Lawn, Mustard Seed, Peacock Feathers, Picked Raspberry, Ripe Persimmon, Wilted Violet. I had intended the card to be a one-layer card. However, I had to change plans as I had a bit of an ink "blob", fortunately close to the edge of the panel. I trimmed the inked panel and matted with black. For the sentiment, I used Paper Smooches' Word Salad stamp set and  Versafine Onyx Black ink. I adhered the panel to a white A2 card base with double-sided tape to complete my card.

Thanks for stopping by
sue

This site uses cookies from Google to deliver its services and analyze traffic. Your IP address and user-agent are shared with Google along with performance and security metrics to ensure quality of service, generate usage statistics, and to detect and address abuse. 

Happy Little Stampers ~ October Stencil Challenge

Stencils - I love them. For me, it's an easy way to add color to a card. With the layered stencils, it's so easy to add multiple colors without having to cover areas of the stencil. If you're like me and love stencils, we have a challenge starting today for you at Happy Little Stampers ~ Stencil Challenge


Here's my card


For my card, I used Taylored Expressions' Buds & Blooms Stamp and Stencils combo which I received as part of my Crop & Create Delivered March 2023 kit. I started with some kraft cardstock and I heat embossed the stems with gold embossing powder. I then used the layered stencils with PinkFresh Studio's Coral Reef, Ballet Slipper, Candy Applie and Olive inks, applied with oval ink blending brushes. For the sentiment, I used Simon Says STAMP's Simply Thank You dies. I die cut the words with gold cardstock and the shadow with vellum. I adhered the panel to a white cardbase with double sided tape. I added some gold strips above and below the stencilled panel. I glued the sentiment to the stencilled panel to complete the card. 

We'd love to see your stencilled cards in our gallery this month.

Thanks for stopping by
sue

This site uses cookies from Google to deliver its services and analyze traffic. Your IP address and user-agent are shared with Google along with performance and security metrics to ensure quality of service, generate usage statistics, and to detect and address abuse. 

Wednesday 4 October 2023

Happy Little Stampers ~ October Christmas Challenge

It's getting close - Christmas will soon be here. If you're looking for inspiration, check out our gallery here at Happy Little Stampers ~ Christmas Challenge. It's time for a new challenge


Here's my card


For my card, I used a stencil, well, actually layering stencils. The set I used was Pretty Pink Posh's Layered Ornaments stencils. I masked the stencil, so only one row would be inked to keep the card clean and simple. I added color with distress inks - Peacock Feathers, Wilted Violet, Mermaid Lagoon, Hickory Smoke applied with oval ink blending brushes. For the sentiment, I used Your Next Stamp's Cool Tag Banner sentiments stamped with PinkFresh Studio's Ocean Breeze ink. I trimmed the A2 card panel slightly and matted with a teal A2 card panel which was then adhered to a white A2 card base to complete my card.

We'd love to see your Christmas card creations in our gallery this month. Will you use a stencil or stencils or not? You pick.

Thanks for stopping by
sue

This site uses cookies from Google to deliver its services and analyze traffic. Your IP address and user-agent are shared with Google along with performance and security metrics to ensure quality of service, generate usage statistics, and to detect and address abuse.

Monday 2 October 2023

Atlantic Hearts Sketch Challenge #545

Happy Monday friends! In Canada, it's Truth and Reconciliation Day. It's a day to reflect on the children sent to Residential Schools who either never returned home or were subjected to inacceptable conditions. Honestly, I hadn't really thought about it until suspected graves of children were identified around the properties of the former Residential Schools. Residential Schools were designed to assimilate Indigenous children into "Canadian" society. I'm understanding better why some people are "messed" up by this and will offer them more grace. 

As it's Monday, it's also time for a new challenge at Atlantic Hearts Sketch Challenge. Here's the sketch, we hope will inspire you


Here's my card


For my clean and simple card, I die cut the foliage using gold cardstock and Simon Says STAMP's Eucalyptus Leaves die. For the sentiment, I started with an A2 panel of natural cardstock and used Simon Says STAMP's Petal Pieces stamp set with gold embossing powder. I trimmed the A2 panel slightly and matted with the same gold cardstock. I used some green grosgrain ribbon for the horizontal band which I adhered between the A2 panel and the gold mat. I adhered the final panel to a white A2 cardbase to complete my card.

We'd love to see how you're inspired by our sketch this fortnight.

Thanks for stopping by
sue

This site uses cookies from Google to deliver its services and analyze traffic. Your IP address and user-agent are shared with Google along with performance and security metrics to ensure quality of service, generate usage statistics, and to detect and address abuse.

Happy Little Stampers ~ October Birthday Challenge

I'm happy to share a card today that I sent to my sister for her birthday. She has received it, so I can now share it and not spoil the surprise. 

lt's time for a new challenge at Happy Little Stampers ~ Birthday Challenge


Here's my card


A little back-story - my sister adopted a cat near the beginning of COVID, Buttercup, more commonly known as Princess Buttercup because she is, well a cat! LOL! I saw this stamp set by CTMH, called Cattitude and thought it would be perfect for my sister. Well, I put the stamp set in a "safe" place and couldn't find it, until this Spring (woohoo). I stamped the image using Memento Tuxedo Black ink onto a white A2 card panel. There was no way that I was coloring all the cats (not even for my sister) but I thought that I would add color to some random cats. I used Copic markers C2, C3, C5, C7, E33, E47, E50, E71, R29, YG91. For the sentiment, I used Unity Stamps' Say It Big dies, which are word dies and shadow dies. For the word, I used gold shimmer cardstock and for the shadow, I used vellum, so as not to cover too many kitties. For the word wishes, I heat embossed with silver embossing powder on vellum, using Clearly Besotted's A Little Sentimental stamp set. I trimmed the vellum down and adhered it to the card. I adhered the panel to a white card base and sent it to my sister.

We'd love to see your birthday card creations in our gallery this month.

Thanks for stopping by
sue

This site uses cookies from Google to deliver its services and analyze traffic. Your IP address and user-agent are shared with Google along with performance and security metrics to ensure quality of service, generate usage statistics, and to detect and address abuse.