Another awesome sketch at CAS(E) this Sketch
Here's my card
I used the Bold Blossoms die by Ellen Hutson and a piece of ink blended cardstock (distress inks - mustard seed, spiced marmalade, ripe persimmon). Sentiment is from Papertrey Ink Keep it simple - Thank You stamp set on a scrap piece of cardstock. I felt that the card needed a bit more pizzazz. I embossed a piece of light blue cardstock with my Cuttlebug Oxford embossing folder.
Here's a close-up
Thanks for visiting
sue
Tuesday, 28 June 2016
Sunday, 26 June 2016
Muse Card Challenge #171
The current MUSE card at Muse Card Challenge is this beauty created by Tracey McNeely
Here's my card
I was inspired by:
Thanks for visiting
sue
Here's my card
I was inspired by:
- the white heat embossing and watercolour
- the general sketch - with greenery in the middle, a purple flower to the right and a yellow-orange flower to the left
- the stitched border on the front panel
- the script-y hello sentiment
Thanks for visiting
sue
Friday, 24 June 2016
Waffle Flower Challenge - June 2016
There is a photo inspiration for the current challenge at Waffle Flower
Here's my card
I just recently picked up the A Bunch stamp set. I used white embossing powder on vellum and then added colour on the reverse side with copics. I felt that the photo inspiration had a bit of an ethereal feel, so I thought that vellum would work to capture that same feel. The copic colours were the closest to those used in the photo, from my meager copic collection. Sorry, I couldn't figure out how to take a good photo of it. I used pearl embellishments at the corners to give me a place to "hide" the adhesive.
Here's a close-up
Thanks for visiting
sue
Monday, 20 June 2016
My Favorite Things - Camp Create
I'm grateful to My Favorite Things They offer wonderful, educational series on their blog. Currently, it's Camp Create.
It was a five day camp highlighting various techniques.
Here's my card for June 13 - Glitzy Glitter
So, I might have "cheated" a bit by using glitter paper as opposed to different colours of glitter (which I do not yet own!). I used MFT DIe-namics Birthday Wishes and Balloons die to cut out the various balloons. I popped up the orange balloon for a bit of added dimension. The sentiment uses MFT Spotlight Sentiments. I had drew balloons strings with a black marker.
Thanks for visiting
sue
Summer Coffee Lovers Blog Hop
Loving that there is another blog hop over at Coffee Loving Cardmakers
Here's my card
The coffee cup and sentiment are from Create A Smile Coffee First stamp set. I stamped the coffee cup and fussy cut it out. I also stamped the cup on a piece of scrap teal and white striped paper and fussy cut out the sleeve. I also fussy cut the heart and coloured it with a copic marker.
The coffee rings are from The Alley Way Stamps Breakfast Club stamp set. The "coffee" splatters were from Tim Holtz's Splatters stencil. I used tea dye distress ink and stamped off once before adding colour through the stencil.
Thanks for visiting
sue
CAS on Sunday Challenge #85
The current challenge at CAS on Sunday is
Butterflies
Here's my card
I had just purchased Memory Box's Reverse Butterfly Collage die. I knew that I just had to use it for this challenge. I used the die with a piece of black cardstock. On the white card base, I used various distress inks (mustard seed, spiced marmalade, picked raspberry and peacock feathers) and ink blending tools and inked up various areas to roughly correspond with the individual butterflies. The sentiment was heat embossed with silver embossing powder and a stamp from Simon Says STAMP Lots of Thanks stamp set.
Thanks for visiting
sue
Sunday, 19 June 2016
One-Layer Simplicity Challenge OLS28
The current challenge at One-Layer Simplicity is
So ... I find one-layer cards a bit challenging. It seems that whenever I work on a one-layer card, I get pretty close to finishing it and then I drop my block and it lands ink side down (just like every time I drop an open-faced peanut butter sandwich, yup, peanut butter side down, LOL) or I get a big smudge mark on it or, well, you understand. I feel that I waste paper that way. However, I understand that this challenge is to embrace one-layer cards and I love to play here!
Here's my card
Instead of using the stencil as a background, I used MFT Wildflowers stencil to add the flowers to my card. I used distress inks (dusty concord, picked raspberry, peeled paint and with daubers to add the colour.
The sentiment is from Simon Says STAMP Lots of Thanks stamp set.
Thanks for visiting
sue
STENCIL
So ... I find one-layer cards a bit challenging. It seems that whenever I work on a one-layer card, I get pretty close to finishing it and then I drop my block and it lands ink side down (just like every time I drop an open-faced peanut butter sandwich, yup, peanut butter side down, LOL) or I get a big smudge mark on it or, well, you understand. I feel that I waste paper that way. However, I understand that this challenge is to embrace one-layer cards and I love to play here!
Here's my card
Instead of using the stencil as a background, I used MFT Wildflowers stencil to add the flowers to my card. I used distress inks (dusty concord, picked raspberry, peeled paint and with daubers to add the colour.
The sentiment is from Simon Says STAMP Lots of Thanks stamp set.
Thanks for visiting
sue
Muse Card Challenge #170
The current MUSE card at Muse Card Challenge is this beauty created by Anita Bowden
Here's my card
I enjoyed the process. I had never really considered heat embossing in layers, like Anita did to create her card. Her first layer was on white. In retrospect, it probably was a good decision as my top layer (picked raspberry) doesn't really show up that well against the second layer (spiced marmalade). Perhaps, I should have stopped after the second layer. Oh well, I'll try it again one day. The first layer was mustard seed. Here's a close-up.
I used the Hero Arts Color Layering Butterflies stamp set.
Thanks for visiting
sue
CAS(E) this Sketch #177
There is a super cute sketch this week as the challenge at CAS(E) this Sketch
Here's my card
I started with the Simon Says STAMP Look for the Miracles stamp set. The little flowers are from The Stamps of Life daisies4your stamp set. The sentiment is from Papertrey Ink Keep it Simple Thank You stamp set.
Thanks for visiting
sue
Here's my card
I started with the Simon Says STAMP Look for the Miracles stamp set. The little flowers are from The Stamps of Life daisies4your stamp set. The sentiment is from Papertrey Ink Keep it Simple Thank You stamp set.
Thanks for visiting
sue
Thursday, 16 June 2016
Calling All Sistahs Blog Hop
Calling All Sistahs is a campaign started by Michele Gross of CAS-ual Fridays Stamps after her discovery of breast cancer. The idea behind
it is to remind our sistahs to do their monthly self exams and yearly
mammograms. Michele designed the Calling All Sistahs collection during her cancer treatment and is now donating 50% of her profits from that line to National Breast Cancer Foundation. This is an important reminder for all my sistahs.
Did you know that 1 in 8 women in the US (I'm not sure what the stats are for other countries. I'm guessing that it's similar here in Canada. OK, I just looked it up for 2015, it's 1 in 9 women in Canada) will develop invasive breast cancer in her lifetime. Look around, do you see 8 women? Think about it, on average, one of them will develop breast cancer. It's up to us to do something to do what we can to reduce that incidence. Annual mammograms and monthly self exams are one way for us to take an active role. This is your monthly reminder.
Michele is being super generous by offering 3 - $15 gift certificates to CAS-ual Fridays Stamps to those leaving comments on the various stops of the blog hop. Only the comments left before 12:00am on the 19th of June will be considered for the gift certificates.
Here are the participants of the Calling All Sistahs Blog Hop
CASual Fridays Stamps <<<Start Here<<<
Here's my card
I used the Hope Ribbon stamp set by CAS-ual Fridays. For the ribbon, I inked it up with Hero Arts Bubble Gum Shadow Ink. To add a bit of dimension, I tapped Picked Raspberry distress ink randomly before stamping the image. The sentiment is from the same stamp set, inked also inked with Bubble Gum shadow ink. I added a few sequins for a bit of sparkle.
Thanks for visiting. Please head to Kim Sherrod as she is the next stop on the Blog Hop.
sue
Wednesday, 15 June 2016
CAS(E) this Sketch #176
There is an awesome, versatile sketch for this week's challenge at CAS(E) this Sketch!
I could see this sketch used in many different ways. Here's my card
I started with My Favorite Things Brick Wall stencil, an ink blending tool and pumice stone distress ink for the background. I was so excited to use a recent purchase, Simon Says STAMP Look for the Miracles stamp set. I stamped the blooms and used a dauber to add distress ink (spiced marmalade, picked raspberry, peacock feathers and twisted citron. I fussy cut the blooms out. The sentiment is from Papertrey Ink's Keep It Simple Thank You Stamp set.
Thanks for visiting
sue
Tuesday, 14 June 2016
Time Out Challenge #58
The current challenge at Time Out Challenges is a photo inspiration challenge. Here's the photo.
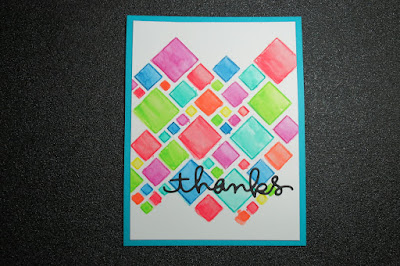
Here's my card
My card was inspired by the multi-color squares in the window.
I used a stencil from iStencils from their all-over repeat stencils. I outlined each square with an inktense colored pencil. With a water brush, I "moved" the color around each square. Some of the squares didn't have enough color, so I "touched" my water brush to the tip of the corresponding inktense pencil to add more color to the square. The sentiment is cut from Simon Says STAMP thanks die. i matted the front panel on a piece of turquoise paper.
Thanks for visiting
sue
Friday, 10 June 2016
Mojo Monday - 451 Contest
The current challenge at Mojo Monday is a contest with prizes - woohoo! Here's the sketch.
Here's my card
I started by masking the front panel, 3/4" on all edges with post-it tape. I then added salty ocean distress ink with an ink blending tool and perfect pearls on top. I carefully removed the post-it tape. I put the front panel in a We R Memory Keepers embossing folder and ran it through my Big Shot. I found a small scrap of printed paper and cut out a circle. I also used a scrap of pink cardstock, with a PTI Keep It Simple Thank You sentiment.
Thanks for visiting
sue
Thursday, 9 June 2016
Essentials by Ellen: June Mix it Up Challenge
The current Mix it Up Challenge at the Classroom at Ellen Hutson is mixing Ellen Hutson with Technique Tuesday.
Here's my card
I went through my sparse collections of Ellen Hutson supplies and Technique Tuesday supplies to see if there were any "matching" or "similar" themes that I could use. I mixed the balloons from Technique Tuesday's Smirthday stamp set and the balloon strings from Ellen Hutson's Wish Big stamp set to create this card. I used a mask for the balloon, so that the red balloon overlapped over the green and purple balloons. I added colour with copic markers.
Thanks for visiting
sue
Monday, 6 June 2016
Thank you card
I was inspired by this card by Judy
Here my card
I masked off, leaving a circle exposed. I used Hero Arts Flower Garden and Hero Arts Spring Hello by Lia with Hero Arts Shadow Inks - Pale Tomato, Bubble Gum and Field Greens. The sentiment is from Hero Arts Everyday Sayings stamped with Hero Arts Shadow Ink - Charcoal.
I used salty ocean distress ink to mimic the sky.
To complete, I used a dark gray mat.
Thanks for visiting
sue
Sunday, 5 June 2016
CAS on Sunday Challenge #84
Loving the current challenge at CAS on Sunday because who doesn't love
SPARKLE Use bling on your card!!!!!
Here's my card
I found some sparkly cardstock (I think that I purchased it from Michaels when it was on sale). I used Simon Says STAMP Sketch Gift die to cut out the outline and the "interior" parts of the gift, from a lighter colour. Yes, I do have glitter everywhere now! The sentiment is from Simon Says STAMP Furry Cat & Box stamp set. I felt that there wasn't enough sparkle, so I used the sparkle paper also as a mat.
Here's a close-up
Thanks for visiting
sue
CAS(E) this Sketch! #175
Here is the sketch for the current challenge at CAS(E) this Sketch!
Here's my card
I stamped the crayon from Lawn Fawn's Color My World stamp set. I added colour with Prismacolor coloured pencils, in rainbow order. The sentiment is from Paper Smooches' Word Salad stamp set.
Thanks for visiting
sue
Here's my card
I stamped the crayon from Lawn Fawn's Color My World stamp set. I added colour with Prismacolor coloured pencils, in rainbow order. The sentiment is from Paper Smooches' Word Salad stamp set.
Thanks for visiting
sue
Saturday, 4 June 2016
Simon Says STAMP Wednesday Challenge
The current challenge at Simon Says STAMP Wednesday Challenge is
Here's my card
I was going to mask off an area with post-it tape, likely a rectangle, stamp flowers and call it good. However, I decided to push myself a bit and try masking a flower by stamping it on a post-it (close to the sticky edge) and then fussy cutting it out. I used the Altenew Scribbled Flowers stamp set. I stamped the bloom in the corner, then added the mask and stamped the other two blooms, so that they slightly overlap. I then masked each flower individually while stamping the leaves. When adding the second layer of the bloom, I stamped the one in the corner, first, covered it with the mask and then proceeded to stamp the second layers of the other blooms. It's a bit of work. However, I'm pleased with the final product. The sentiment is from Simon Says STAMP Big Scripty Greetings.
Thanks for visiting
sue
MASK IT
There are several ways you can create a mask, by simply tearing paper you can create hills and valleys, die cutting a shape, using a stencil or masking fluid or simply stamping an image onto scratch paper and cutting around it. We are showcasing Altenew Products this week. You don’t have to use them to join in but if you have some we would love to see them usedHere's my card
I was going to mask off an area with post-it tape, likely a rectangle, stamp flowers and call it good. However, I decided to push myself a bit and try masking a flower by stamping it on a post-it (close to the sticky edge) and then fussy cutting it out. I used the Altenew Scribbled Flowers stamp set. I stamped the bloom in the corner, then added the mask and stamped the other two blooms, so that they slightly overlap. I then masked each flower individually while stamping the leaves. When adding the second layer of the bloom, I stamped the one in the corner, first, covered it with the mask and then proceeded to stamp the second layers of the other blooms. It's a bit of work. However, I'm pleased with the final product. The sentiment is from Simon Says STAMP Big Scripty Greetings.
Thanks for visiting
sue
MFT Card Challenge - Wednesday Sketch Challenge #283
There's a super cute sketch over at MFT Wednesday Sketch Challenge
Here's my card
I started with the sentiment from MFT LJD Birthday Greetings. I cut it out with MFT Die-namics Zig Zag Stitched Ovals.
For the background, I used the long row of gift boxes from MFT Celebrate You stamp set. I pulled out my Colorbox paintbox - bright with 12 colours. I placed the stamp onto the inks, lifted it and re-applied, moving slightly to blend the colours. I repeat this four times, flipping the paintbox after two, to bring in some other colours.
Thanks for visiting
sue
Muse Card Challenge #168
The current challenge at Muse Card Challenge is this great card created by Leigh Penner
OK - I admit it. I wasn't going to "play" this week because I had no idea what to do! Good job, Leigh - this was a great exercise to "stretch" and be creative because I have no "food" stamps, certainly no hamburger stamp! I kept coming back to Leigh's card because I didn't really want to give in. So I looked at some of the elements - the woodgrain background, the basic sketch and frame, the colours - red, yellow, cream, kraft, sentiment including the word "happy".
Here's what I came up with
I started with cream cardstock and Stampin Up's Woodgrain stamp and Stampin Up's Sahara Sand ink. I cut out the frame from kraft cardstock and cut out the centre panel with MFT Die-namics Zig Zag Stitched Rectangles. The sentiment is from Simon Says Clear Stamp Happy stamp set. I added distress inks (mustard seed, barn door, pumice stone) to the centre panel with ink blending tools.
Thanks for visiting
sue
Wednesday, 1 June 2016
CASology: Week 200
The current challenge at CASology includes a celebration of its 200th challenge.
Here's my card
I used Lawn Fawn's Let's Roll stamp set for the blossoms and sentiment. For the blossoms, I stamped with Hero Arts Passion Flower Shadow Ink and then carefully added Hero Arts Bubble Gum Shadow Ink to the edges of the blossoms. I added some rhinestones for the centres of the flowers for a bit of sparkle.
Thanks for visiting
sue
Retro Rubber Challenge #39
The current challenge at Retro Rubber is
Here's my card
I used the Stampin' Up Flower Shop stamp set and punch to create my card. The Flower Shop stamp set was introduced for the June 2013-May 2014 season. I also used Stampin' Up inks Melon Mambo, Pumpkin Pie, Gumball Green and Tempting Turquoise. The sentiment is from Papertrey Ink - Keep it Simple Birthday Stamp set.
Thanks for visiting
sue
House of Cards End of Term Blog Hop
Over at House of Cards, we're having an End of Term Blog Hop and we'd love for you to join us.
Can you believe we've are at the end of our fifth term at House of Cards?! Unfortunately we are saying a fond farewell to some of our DT members and fortunately we are so happy to have those staying on. To say goodbye and thank you, we're celebrating with a blog hop!
This hop will run FROM June 1ST AT 6:00 AM CST THROUGH June 15TH AT NOON CST, ANY CARD STYLE is welcome and we've got a gorgeous photo inspiration for your crafting enjoyment!
Prize: $25 Gift Certificate
REVERSE CONFETTI offers on trend, high quality photopolymer stamps, high quality CONFETTI CUTS steel dies and exclusive paper products to coordinate with our releases…all made in the USA.
Great Impressions
Can you believe we've are at the end of our fifth term at House of Cards?! Unfortunately we are saying a fond farewell to some of our DT members and fortunately we are so happy to have those staying on. To say goodbye and thank you, we're celebrating with a blog hop!
This hop will run FROM June 1ST AT 6:00 AM CST THROUGH June 15TH AT NOON CST, ANY CARD STYLE is welcome and we've got a gorgeous photo inspiration for your crafting enjoyment!
***PRIZE WINNERS FROM THE BLOG HOP WILL BE ANNOUNCED ON THE 20TH OF JUNE.***
***CARD WINNERS WILL BE ANNOUNCED NEXT MONTH ON THE 15TH, AS PER THE USUAL HERE AT HOC. THANK YOU!***
Here is the photo inspiration~
So,
are you ready to get hopping?! Yep, it's time, but first we've got
some fabulous sponsors to share with you! Make sure you leave a comment
at each person's blog along the way because the prizes are hidden and
we'll be doing random drawings from the blogs where they are hiding! :)
After you're done, make a creation to share with us here, too, for
another chance to win!
Here are all of our fabulous sponsors.
Our team will be using a variety of products
from these amazing companies!
Prize: 3 Digital Images
A
Day For Daisies provides themed categories of over 1000 digital
illustrations, including fairy tales and magical mermaids, cutie kids,
vintage illustrations, sentiments and lovely designs for all occasions!
ADFD WEBSITE: www.adayfordaisies.com
ADFD BLOG: http://adayfordaisies.blogspot.com
ADFD ETSY: http://www.etsy.com/shop/adayfordaisies
Prize: $25 Gift Certificate
REVERSE CONFETTI offers on trend, high quality photopolymer stamps, high quality CONFETTI CUTS steel dies and exclusive paper products to coordinate with our releases…all made in the USA.
Great Impressions
Prize: Prize Package
Great
Impressions was founded in 1984 by Ken and Deone Mackenzie. With a
love for stamping, the company grew. The result is a quality rubber
stamp in either wood mount or stickable mount backing for all your
stamping needs. Great Impressions' goal is to provide the highest
quality stamps and to inspire creativity!
Prize: Any three products of your choice!
MHKDesigns is a vintage digital stamp Etsy shop owned and operated by Mynn Kitchen from On A Stampage. She creates vintage stamp
sets and digital paper packs for all your crafting needs. Contact her
with any requests you have at mhkdesigns.etsy@gmail.com!
You should have arrived from
Steph
If you get lost along the blog hop, you can always head back to House of Cards
Steph
If you get lost along the blog hop, you can always head back to House of Cards
Here's my card
I started with Great Impressions Wildflower Silhouette stamp. I added colour with distress ink markers (Mowed Lawn, Worn Lipstick, Picked Raspberry and Mustard Seed) and lightly spritzed with water before stamping the image. I was inspired by all the florals and picked colours from the inspiration photo. I cut out the panel with MFT Die-namics Zig Zag Stitched Oval. To pop up the oval, I cut a piece of fun foam, just a little smaller than the stamped oval. The sentiment is from Simon Says STAMP Lots of Thanks stamp set.
Thanks for visiting. Next on the blog hop is Susan
sue
Subscribe to:
Posts (Atom)