Monday, 26 December 2022

Atlantic Hearts Sketch Challenge #505

Phew! It's over! Did you survive Christmas? It seems crazy that we prepare for Christmas for months and then after Santa visits and the big meal is enjoyed, it's over, for another year. Boxing Day is a great day to recover from the phrenetic pace of the past few months. We have a new challenge starting today at Atlantic Hearts Sketch Challenge.

Here's my card


I still have my Christmas stuff out (let's face it, I'm not very good at putting things away!) so I made this Christmas card. Guess I'm getting an early start for next year - LOL! I started with the red striped paper which I cut to an A2 sized panel. I then die cut the green label using a Spellbinders' Nestabilities Labels 8 die. I die cut the berries and holly leaves using Dee's Distinctively Wreath Builder dies and scraps of red and green cardstock. For the sentiment, I used Clearly Besotted's Say What stamp set and a scrap of light green cardstock, trimmed to a small rectangle. I adhered all the pieces onto the background panel which was then attached to a white A2 card base with double-sided tape.

Hoping you can find some time for yourself at your craft table. We'd love to see how you're inspired by our sketch by posting in our gallery.

Thanks for stopping by

sue

This site uses cookies from Google to deliver its services and analyze traffic. Your IP address and user-agent are shared with Google along with performance and security metrics to ensure quality of service, generate usage statistics, and to detect and address abuse.

Thursday, 15 December 2022

Die Cut Divas with Polkadoodles in December

It's our last challenge of 2022. We're so happy to be sponsored this month by Polkadoodles. They will be giving our winner three digi-stamps from their online store.

Our challenge this month is

ANYTHING WINTER OR CHRISTMAS THEMED

Here's my card


For my card, I started with Polkadoodles Penguin Candy Canes digital stamp which I sized and printed on white cardstock with my inkjet printer. I added color with Copic markers - B00, BG49, R22, R29, V15, Y38, YG09, GR04, 100. I die cut the white cardstock with a Waffle Flower's A2 Layers die and added a black mat, die cut with a Waffle Flower's Additional A2 Layers die. I found some colored patterned paper that went with my image and die cut an A2 panel with a Waffle Flower A2 Layers die. I adhered all the layers together with double-sided tape to complete my card. I couldn't decide on a sentiment, so I've left this card without a sentiment.

We'd love to see your WINTER OR CHRISTMAS THEMED project in our gallery this month. Hoping you have some time to craft in between all of the parties and dinners! Please don't forget to use at least one die cut.

Thanks for stopping by
sue

This site uses cookies from Google to deliver its services and analyze traffic. Your IP address and user-agent are shared with Google along with performance and security metrics to ensure quality of service, generate usage statistics, and to detect and address abuse.

Wednesday, 14 December 2022

Perfectly CAS ~ Challenge #34 December 2022

At this time of year when things are bustling, with people rushing, getting ready for Christmas, I find crafting helps to calm me. I find clean and simple crafting, in particular helps to relax me. Well, if you're in need of some calming, consider participating in our last challenge of 2022 at Perfectly CAS. Our challenge this month is


Perfect challenge theme for December, right? Here's my card


For my card, I used Your Next Stamp's Believe in the Magic stamp set. I stamped the reindeer in the center of a white A2 card panel with Memento Tuxedo Black ink. I added color with Copic markers - C3, E25, E33, E59, G82, R29. I heat embossed the sentiment from the same stamp set with silver embossing powder, below the reindeer. I attached the panel to a white A2 card base with double-sided tape to complete my Christmas card.

We'd love to see your Christmas inspired cards. Please remember to fill one-third or less of your card to keep it clean and simple. Ahhhh, I feel better. Think I might spend more time away in my craft space than out in the malls! LOL!

Thanks for stopping by
sue

This site uses cookies from Google to deliver its services and analyze traffic. Your IP address and user-agent are shared with Google along with performance and security metrics to ensure quality of service, generate usage statistics, and to detect and address abuse.

Monday, 12 December 2022

Atlantic Hearts Sketch Challenge #503

It's Monday so it must be time for a new challenge at Atlantic Hearts Sketch Challenge. Here's our sketch which we hope will inspire you


Here's my card (I rotated it 90 degrees to the left).


For the background, I was inspired by the one and only Jennifer McGuire in this video - the part around the 27th minute is how I created my background. I started by inking a white A2 card panel with Gina K Designs Wild Lilac and Blue Raspberry inks with oval ink blending brushes. I applied a fair bit of pressure on the brushes. Using my MISTI, I stamped the snowflakes using Lawn Fawn Frosties and Hero Arts Snowflakes stamp sets first partially with one ink color and then followed by the other ink color for a bit of a tone-on-tone look. I made the "window panes" with strips of silver cardstock. At the intersection of the two strips, I placed a silver snowflake die cut using Simon Says STAMP's Alexis Snowflake die. For the sentiment, I heat embossed it on a scrap of purple cardstock using Clearly Besotted's Sentimental Type stamp set and silver embossing powder. I adhered all the pieces and then attached the panel to a white A2 card base with double sided tape to complete my card.

We'd love to see how you were inspired by our sketch.

Thanks for stopping by
sue

This site uses cookies from Google to deliver its services and analyze traffic. Your IP address and user-agent are shared with Google along with performance and security metrics to ensure quality of service, generate usage statistics, and to detect and address abuse.

Tuesday, 6 December 2022

Happy Little Stampers ~ Stencil Challenge ~ December 2022

Can't believe that it's already December! I remember lamenting during the spring that time seemed to have stood still. But lately, the days are flying by. I guess that's the way it is when you have a lot of stuff to do! 

We have our final challenge at Happy Little Stampers ~ Stencil Challenge


Here's my card


For my card, I used PinkFresh Studio's Holiday Botanical Background Stencils. It's a set of 4 layering stencils. For the color, I used distress inks - twisted citron, mowed lawn, peeled paint, candied apple, all applied with oval ink blending brushes. I really like stenciling with my Wendy Vecchi's Make Art STAY-tion. It's a metallic board with four magnets which hold your card panel and stencils in place. I stenciled a white A2 card panel with the four layering stencils and the distress inks. For the sentiment, I used Catherine Pooler Designs' Winterhaven Collection stamp set and gold embossing powder which was heat set. I attached the card panel to a white A2 card base with double-sided tape. 

We'd love to see your stenciled cards in our gallery this month. Please note that we're taking a vacation in 2023 and will be back with more challenges starting March, 2023.

Thanks for stopping by
sue

This site uses cookies from Google to deliver its services and analyze traffic. Your IP address and user-agent are shared with Google along with performance and security metrics to ensure quality of service, generate usage statistics, and to detect and address abuse.

Try Stampin' On Tuesday ~ Challenge #586

Ready for a new challenge? We have a new one at Try Stampin' On Tuesday


Optional Theme: Plaid

Here's my card


You can see that I did incorporate our optional theme of PLAID onto my card. I used Echo Park's Magical Plaid Stencil with distress inks (spun sugar, salvaged patina, shaded lilac) applied with oval ink blending brushes on a white A2 card panel. I trimmed the panel to 3 1/4" x 4 1/2" and adhered it to a purple A2 card panel. For the sentiment, I used Papertrey Ink's Ways to Say: Birthday stamp set and Concord & 9th's Dove ink, stamped onto a scrap of light teal. I cut the sentiment strip into a double fish-tail banner and adhered it to my panel. To complete my card, I attached the purple panel to a white A2 card base.

We'd love to see your interpretation of our sketch in our gallery.

Thanks for stopping by

sue


This site uses cookies from Google to deliver its services and analyze traffic. Your IP address and user-agent are shared with Google along with performance and security metrics to ensure quality of service, generate usage statistics, and to detect and address abuse.

Sunday, 4 December 2022

Happy Little Stampers ~ Christmas Challenge ~ December 2022

We've made it to December! Hopefully, you've been playing along with us here at Happy Little Stampers ~ Christmas Challenge and should have a little stash of Christmas card ready to mail out! Well our final challenge for 2022 is


Here's my card


For my card, I used Pretty Pink Posh's Layered Ornaments stencils. It's a set of three stencils. I checked out this Jennifer McGuire video and at around the 19 minute mark, she shares a brilliant way to help keep each ornament its own unique color. I would have used a ton of post-it notes to try to separate the colors. She used a scrap of cardstock with a circle punched out as a mask. Brilliant! I used a 1 1/4" circle punch to create my mask. I used a lot of distress inks to make my colorful card - picked raspberry, wilted violet, blueprint sketch, salty ocean, fossilized amber, carved pumpkin, candied apple, twisted citron, mowed lawn, peacock feathers (listed in no particular order), applied with oval ink blending brushes. For the second layer, I used the same colors, just added a bit more ink and pressure to get a tone-on-tone look for each of the ornaments. For the hanger of the ornaments on the third layer, I used Concord & 9th's Dove ink. For the sentiment, I die cut using Simon Says STAMP's Deco Trees dies and silver cardstock. I adhered the card panel to a white A2 card base to complete my Christmas card.

We'd love to see you Christmas cards in our gallery this month. Please note that we'll be taking a vacation in 2023 and will be back in March.

Thanks for stopping by
sue

This site uses cookies from Google to deliver its services and analyze traffic. Your IP address and user-agent are shared with Google along with performance and security metrics to ensure quality of service, generate usage statistics, and to detect and address abuse.

Friday, 2 December 2022

Happy Little Stampers ~ Birthday Challenge ~ December 2022

It's our last challenge for 2022 here at Happy Little Stampers ~ Birthday Challenge


Here's my one-layer Birthday card


For my card, I used Simon Says STAMP's Celebrate Balloons stencil along with my Wendy Vecchi's Make Art STAY-tion. I have both the mini version and the larger version. I really like the STAY-tion - no need for low tack tape. The card and stencils are held in place by four magnets. Seeing that this stencil is a smaller one, I found it necessary to move the magnets around to permit good ink coverage. I added color with Distress Inks (twisted citron, peacock feathers, blueprint sketch) applied with oval ink blending brushes. I removed the stencil. I then stamped the sentiment using Papertrey Ink's Sentiment Staples: Birthday stamp set with Hero Arts Aquatic ink to complete my card.

We'd love to see your birthday creations in our gallery this month. Please note that we'll be taking a little vacation in January 2023 but will be back in March.

Thanks for stopping by
sue

This site uses cookies from Google to deliver its services and analyze traffic. Your IP address and user-agent are shared with Google along with performance and security metrics to ensure quality of service, generate usage statistics, and to detect and address abuse.

Wednesday, 30 November 2022

Happy Little Stampers ~ Watercolour Challenge ~ December 2022

We've made it! It's the last month of the year 2022. It's time for a new challenge at Happy Little Stampers ~ Watercolour Challenge


Here's my card


I started with an A2 panel of 96 lb bristol and Simon Says STAMP's Domed Arches stencil set. I chose the larged arched shape and smooshed distress inks (chipped sapphire, faded jeans, blueprint sketch) on it and spritzed a bit of water. I then "stamped" the inked stencil onto the bristol and carefully removed it, after a few seconds to let the ink transfer. I then used a slightly damp paint brush to move some of the color around, especially along the edges. I let the panel dry. I die cut the dove using Penny Black's Peaceful Wishes die from some white shimmer cardstock (it doesn't show up that well on the photo). When the panel was dry, I heat embossed the sentiment using Paper Smooches A Blessed Christmas stamp set and silver embossing powder and adhered the dove. To complete my card, I adhered the panel to a white A2 card base.

We'd love to see your watercolour projects in our gallery. Just be sure to use water on your project. Also, we'll be taking a bit of a vacation. We'll be back in March.

Thanks for stopping by
sue

This site uses cookies from Google to deliver its services and analyze traffic. Your IP address and user-agent are shared with Google along with performance and security metrics to ensure quality of service, generate usage statistics, and to detect and address abuse.

Die Cut Divas ~ Last Day for Birch Press Design

Today is the last day of our challenge at Die Cut Divas. Our challenge is

ANYTHING GOES

Our sponsor this month is Birch Press Design who will be awarding our winner a $20 gift card to their online store.


Here's my card


For my card, I started by creating some colored cardstock. I used white card panels and inked up areas with distress inks (picked raspberry, ripe persimmon, mustard seed, mowed lawn, peeled paint) all applied with oval ink blending brushes. I then die cut the flower and leaf pieces using Birch Press Design's Pimpernel Contour Layers dies. I adhered the pieces, creating three flowers, each with a leaf. I adhered the flowers to a light olive A2 card panel. For the sentiment, I inked up a scrap of white cardstock with mustard seed, ripe persimmon and picked raspberry which I then used to die cut the sentiment using Birch Press Design's Hello Sugar Script die. I attached the sentiment to the card panel and then glued the panel to a white A2 card base to complete my card.

You still have time to join our challenge today. Please remember to include at least one die-cut.

Thanks for stopping by
sue

This site uses cookies from Google to deliver its services and analyze traffic. Your IP address and user-agent are shared with Google along with performance and security metrics to ensure quality of service, generate usage statistics, and to detect and address abuse.

Monday, 28 November 2022

Atlantic Hearts Sketch Challenge #501

On this fine Monday, we have a fun challenge for you at Atlantic Hearts Sketch Challenge


Here's my card


For this card, I started with the striped patterned paper in Photoplay's Say It With Stamps Brights 6x6 paper pad. I chose three colors that are more "masculine". I die cut them using Poppy Stamps Echo Blossoms dies and arranged them on a light blue A2 card panel. I stamped the sentiment on a scrap of gold/orange cardstock using Ink Blot Shop's Simple Sentiment stamp set and Versafine Onyx Black ink. I trimmed the sentiment down to two rectangles. I adhered them to the ard and added three clear dots to finish the card panel. All that was left was to attach the panel to a white A2 card base.

We'd love to see how you're inspired by our sketch this week. 

Thanks for stopping by
sue

This site uses cookies from Google to deliver its services and analyze traffic. Your IP address and user-agent are shared with Google along with performance and security metrics to ensure quality of service, generate usage statistics, and to detect and address abuse.

Tuesday, 22 November 2022

Try Stampin' On Tuesday ~ Challenge #584

It's Tuesday which can only mean that it's time for a new challenge at Try Stampin' On Tuesday. Here's our challenge


We've also paired with Double Trouble Paper Crafting

Thing 1: Trouble Maker 

says, "Wow! We missed National Trail Mix Day. Trail Mix, aka GORP (a mix of certain cereals, nuts, pretzels, raisins, dried fruits, M&Ms, etc.).  Sounds yummy, but we have a yummy trail mix for Scrapper's GORP.   

"Do you remember way back years ago when you didn't mix plaids, stripes, checks, flowers and polka dots. Not true today... This is our recipe for Scrapper's GORP.  Look through your stash for stamps, stencils, patterned papers, washi tape, etc., to find at least two or more of the ingredients in our Scrapper's Gorp and include them on your project... it's your choice of ingredients."

You may OPT to use Try Stampin' on Tuesday's sketch to the right - or not, but this is a perfect sketch for our Scrapper's GORP and if you use this sketch you will earn two chances in our random draw. 

You can stop here... 
OR  
Play with Twisted Sister's optional twist below to earn another chance in our random draw. 

Thing 3:  Twisted Sister 
says, "I love mixing patterns.  You'll find me in a polka dot striped Shirt, floral pants and a plaid hat.  There are so many things that I have to mix and piece together.  

"Have you ever tried paper piecing technique? It can be a lot of fun!  Here is a YouTube tutorial that may help you with this technique MFT Tips & Tricks - Paper  Piecing.  Include an image(s) and show us your piecing skills.  

Optional Twist:  If you have included paper piecing in your project you will earn another chance in our Random Draw.

Thing 2:  Double Dare 
says, "If you have met Thing 1's requirement 'Scrapper's Gorp, and used the TSOT's sketch, with or without piecing, you are eligible to enter your project HERE  at Try Stampin' on Tuesday Sketch Challenge #584 for an additional chance at our random draw. 

Here's my card


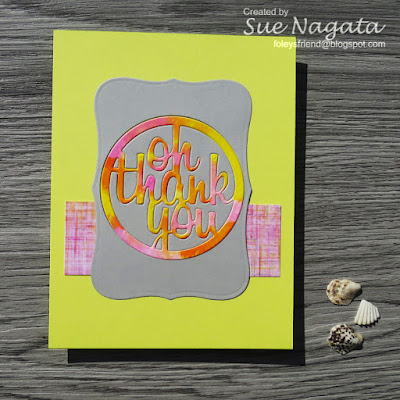
For my card, I followed the sketch. I started by inking up some 96 lb bristol with distress inks (picked raspberry, mustard seed, carved pumpkin) and a paint brush with some water. I let the panel dry and die cut using My Favorite Things Die-Namics Oh Thank You die. I also die cut the gray label using a Spellbinders Nestabilities Labels 8 die and die cut the center out with My Favorite Things Die-Namics Oh Thank You die, being sure to save all the little bits! I chose a yellow A2 card panel and a scrap of patterned paper that used some of the same colors, which I cut into a strip to follow the sketch. I adhered the strip into place. I did some inlaid die cutting - placing the colorful die cut in the spaces of the gray label die cut and added all the little bits, adhering it all to the yellow card panel. To complete my card, I adhered it to a white A2 card base.

We'd love to see your creations in our gallery. Will you choose the technique or will you choose the sketch or will you do both?

Thanks for stopping by
sue

This site uses cookies from Google to deliver its services and analyze traffic. Your IP address and user-agent are shared with Google along with performance and security metrics to ensure quality of service, generate usage statistics, and to detect and address abuse.

Thursday, 17 November 2022

Time to get Inky ~ Less Is More Challenge #477 and Simon Says STAMP Wednesday Challenge

I found some time to get inky. It's my favorite thing to do - sit down at my craft table to make something. Being that Christmas is just around the corner, here's my card


For my card, I inked up the top of a white A2 card panel with Simon Says STAMP's Berries and Leaves stencil with distress inks (barn door and mowed lawn) applied with mini ink brushes. Even with the mini ink brushes, I still found that I needed some post-it notes to mask off areas. Perhaps, I'm just a bit careless with my ink blending. This was my second attempt - I kind of went a bit too far with my ink blending on the first attempt. For the sentiment, I heat embossed the sentiment using Clearly Besotted's Sentimental Type stamp set and silver embossing powder. I trimmed the panel down a bit and adhered it to a white A2 card base to complete my card.

I'm entering this card at Less Is More Challenge, Challenge #477 - Colour Wheel, I used complementary colors red and green (imagine that for a Christmas card!).

I'm also entering this card at Simon Says STAMP Wednesday Challenge where the challenge is

STENCIL IT
Thanks for stopping by
sue

This site uses cookies from Google to deliver its services and analyze traffic. Your IP address and user-agent are shared with Google along with performance and security metrics to ensure quality of service, generate usage statistics, and to detect and address abuse.

Monday, 14 November 2022

Atlantic Hearts Sketch Challenge #499

Happy Monday Friends! It's time for a new challenge at Atlantic Hearts Sketch Challenge.


Here's my take on the sketch


I flipped the sketch upside down. This is my attempt at a masculine birthday card. I started by stamping the sentiment using Simon Says STAMP's Big Scripty Greetings and my Color Box Paint Box - Classic Pigment Ink Pad - Bright set. I used mainly the green/teal/blue colors and when inking the stamp, I moved the colored inks slightly left and right to blend adjacent colors. I trimmed the panel to 2 3/4" x 3 3/4" and amtted with royal blue cardstock. I found some patterned papers that went with my color scheme and added them, placing them as the sketch dictated. For the balloons, I die cut them from scraps of cardstock using Paper Smooches' Balloons dies. I adhered them to the corner of the sentiment panel with some silver thread as the balloon strings.

We'd love to see your interpretation of the sketch in our gallery.

Thanks for stopping by
sue


This site uses cookies from Google to deliver its services and analyze traffic. Your IP address and user-agent are shared with Google along with performance and security metrics to ensure quality of service, generate usage statistics, and to detect and address abuse.

Perfectly CAS ~ November Challenge

Mid-November? Already? Yikes - time is sure flying by. It's time for a new challenge at Perfectly CAS


Great theme for this time of year (well, if you live well above the tropics in the Northern Hemisphere)! Here's my card


My clean and simple card features a sparkly snowflake and sentiment. I started with a white A2 card panel. I die cut the snowflake using Simon Says STAMP's Maryann Snowflake die, centered horizontally and slightly towards the top vertically. I didn't bother trying to "save" the center piece. I cut a small piece of sparkly silver cardstock and adhered it behind the snowflake opening. Here's a close-up


For the sentiment, I used CASual Fridays' Snowy Sayings stamp set and silver embossing powder which was heat set. To complete the card, I adhered it to a white A2 card base.

We'd love to see your snowflake creations in our gallery. Please remember to cover only one-third or less of your card front.

Thanks for stopping by
sue

This site uses cookies from Google to deliver its services and analyze traffic. Your IP address and user-agent are shared with Google along with performance and security metrics to ensure quality of service, generate usage statistics, and to detect and address abuse.

Saturday, 12 November 2022

Addicted to CAS ~ Challenge# 233

Hello Crafty Friends! We have a new challenge at Addicted to CAS.


Here's my card


For my card, I used Photoplay SCT (Scrapbook and Cards Today) Exclusive Birthday Photopolymer stamp and metal dies which I received as part of SCT's Crop and Create Delivered October 2021 event. I stamped the image on white cardstock with Memento Tuxedo Black ink. I added color with Copic markers - BG05, R22, V15, YG06, YR04 and then die cut the image with the corresponding die. To make the die cut stand out, I ink blended some tumbled glass distress ink with an oval ink blending brush on a white A2 card panel. I adhered the die cut to the white card panel. I then stamped the sentiment using Simon Says STAMP's Furry Cat & Box stamp set with Memento Tuxedo Black ink. I trimmed the white panel down slightly and matted with a black A2 card panel which was then adhered to a white card base to complete my card. 

We'd love to see you "PRESENT" card in our gallery. Please remember to keep it clean and simple.

Thanks for stopping by
sue

This site uses cookies from Google to deliver its services and analyze traffic. Your IP address and user-agent are shared with Google along with performance and security metrics to ensure quality of service, generate usage statistics, and to detect and address abuse.

Wednesday, 9 November 2022

Die Cut Divas ~ November with Birch Press Designs

Our November challenge at Die Cut Divas is

ANYTHING GOES

We're happy to have Birch Press Designs as our sponsor this month. They will be giving our winner a $20 gift card to their online store. Thank you Birch Press Designs.

Here's my card


One of the items that Birch Press Designs is known for is their selection of layering dies. I used their Splendor Mini Tile Layer Set on my card. This die set contains three different dies for three layers. I die cut the focal image from light blue, light gray and teal cardstock. I adhered the layers together and adhered it to a light gray panel. I wanted to mat the gray panel, so I trimmed it with a die from Waffle Flower's Additional A2 Layers die set and then die cut the mat with a die from Waffle Flower's A2 Layers die set. For the sentiment, I stamped it with Clearly Besotted's A Little Sentimental stamp set on a scrap of orange cardstock. I die cut the sentiment with a My Favorite Things Skinny Strips die set. 

We'd love to see your ANYTHING GOES card. Please remember to use a die on your project, as we are Die Cut Divas!

Thanks for stopping by
sue

This site uses cookies from Google to deliver its services and analyze traffic. Your IP address and user-agent are shared with Google along with performance and security metrics to ensure quality of service, generate usage statistics, and to detect and address abuse.

Tuesday, 8 November 2022

Try Stampin' On Tuesday ~ Challenge #582

Happy Tuesday! It's time for a new challenge at Try Stampin' On Tuesday. For the next fortnight, our challenge will be 


Optional Theme: Sweater Texture

Here's my card


Quite obviously, I flipped the sketch upside down and did not incorporate the optional theme onto my card. I used Your Next Stamp's Crappy Times stamp set for my card. I stamped the three images using Memento Tuxedo Black ink. I added color with Copic markers - B12, C2, C3, C7, E43, R11, V15. I used a Sizzix circle die to die cut the little mouse and the toilet paper holder. I used some gray patterned paper for the main background and a scrap of patterned paper for the fishtail banner, which picked up on the pink of the cat and mouse. The sentiment, stamped on darker gray cardstock is from the same stamp set. 

We'd love to see how you're inspired by our sketch and whether you'll use the optional theme: sweater texture on your card. Looking forward to seeing your creation in our gallery.

Thanks for stopping by

sue


This site uses cookies from Google to deliver its services and analyze traffic. Your IP address and user-agent are shared with Google along with performance and security metrics to ensure quality of service, generate usage statistics, and to detect and address abuse.

Sunday, 6 November 2022

Happy Little Stampers ~ Stencil Challenge November 2022

November challenges ~ crazy, right? How is it possible that it's already November? Wasn't it just July? Feels like I've gone through some weird time continuum. 

Nonetheless, it's time for a new challenge at Happy Little Stampers ~ Stencil Challenge

Here's my card


It's a one-layer stenciled card! It doesn't have the typical look of a stencil. However when using layering stencils, one can achieve a great look with some inks and ink blending tools.  I started by stamping the floral image using PinkFresh Studio's Handpicked Flowers stamp set and Versafine Onyx Black ink on a white A2 card base. I added color with the matching PinkFresh Studio's Handpicked Flowers layering stencils and distress inks (spun sugar, kitsch flamingo, dried marigold, saltwater taffy, twisted citron, mowed lawn) applied with oval ink blending brushes. I stamped the sentiment using Your Next Stamp's Cool Tag Banner Sentiments with Concord & 9th's Dove ink to complete the card. 

We'd love to see your stenciled cards in our gallery.

Thanks for stopping by
sue

This site uses cookies from Google to deliver its services and analyze traffic. Your IP address and user-agent are shared with Google along with performance and security metrics to ensure quality of service, generate usage statistics, and to detect and address abuse.

Friday, 4 November 2022

Happy Little Stampers ~ Christmas Challenge ~ November

It's getting closer - Santa will soon be visiting. I'm slowly starting to get ready. I at least, have figured out what my Christmas card will be. You'll have to wait until the New Year to see it - just in case any of my recipients also read my blog, I want it to be a surprise!


I had a look through my Christmas stamp sets and it revealed a shortage of Santa stamps. Snowmen - I have them covered. Santa? Not so much. I did find one which I used on my card this month


This Santa comes from Whipper Snapper Designs - Believe Santa Rectangle stamp set. I stamped this image with Memento Tuxedo Black ink on some white cardstock. I added color with Copic markers  B00, BG10, E21, E50, G07, R29, W2. I then fussy cut the image.I looked for some patterned Christmas paper where the colors "went" with the colors I chose for my image. I settled on this paper with lots of Christmas trees. I glued the pieces to a light teal A2 card panel which was then adhered to a white A2 card base to complete my card.

We'd love to see your Christmas-inspired cards in our gallery this month.

Thanks for stopping by
sue

This site uses cookies from Google to deliver its services and analyze traffic. Your IP address and user-agent are shared with Google along with performance and security metrics to ensure quality of service, generate usage statistics, and to detect and address abuse.

Wednesday, 2 November 2022

Happy Little Stampers ~ November Birthday Challenge

It's time for a new challenge at Happy Little Stampers ~ Birthday Challenge. Our challenge is always


Here's my card


If this looks familiar, it should be. Here is last month's card


I had a left over strip of the background from October's card, which I used for this month's card. To review, I used Concord & 9th's Turnabout Jig, Concord & 9th's Celebrations Turnabout stamp set and Concord & 9th's inks - honeysuckle, grapefruit, sprout, aqua sky to create the background panel. I matted the strip with a light gray. For the sentiment, I die cut the word birthday from Concord & 9th's honeysuckle cardstock using a Unity Stamps' Say It Big Die which I glued to a light gray panel. The word happy uses Papertrey Ink's Sentiment Staples: Birthday stamp set and Concord & 9th's Dove ink. I like it when you create a panel and can use it for two different cards. I call that a win!

We'd love for you to join us in the gallery this month. It's a great way to build up your stash of birthday cards.

Thanks for stopping by
sue

This site uses cookies from Google to deliver its services and analyze traffic. Your IP address and user-agent are shared with Google along with performance and security metrics to ensure quality of service, generate usage statistics, and to detect and address abuse.

Monday, 31 October 2022

Atlantic Hearts Sketch Challenge #497

Happy Halloween Friends! It's time for a new challenge at Atlantic Hearts Sketch Challenge. Here's our sketch which we hope will inspire you


While this Halloween-inspired card is super fun, I don't really have many Halloween stamps and dies. So I went in an entirely different direction. Here's my card


I started with two pieces of STAMPlorations Ephemera for the Love of Coffee. Next, I looked through my collection of 6x6 paper packs for some "coffee" colored patterned papers. I cut two rectangles and a few small fish-tailed banners for the card. I stamped the sentiment using STAMPlorations Coffeecionado stamp set and Hero Arts Cup O' Joe ink on a strip of kraft cardstock. I adhered all the pieces according to the sketch on an A2 panel of natural cardstock, which was in turn adhered to a white A2 card base to complete my card.

We'd love to see how you're inspired by our sketch by posting your card in our gallery.

Thanks for stopping by
sue

This site uses cookies from Google to deliver its services and analyze traffic. Your IP address and user-agent are shared with Google along with performance and security metrics to ensure quality of service, generate usage statistics, and to detect and address abuse.

Happy Little Stampers ~ Watercolour Challenge ~ November 2022

Yikes! November? Say it isn't so. I have a ton of stuff to accomplish before Santa comes. I need to make a list and check it twice. Oh wait - wrong list! LOL!

We have a new challenge at Happy Little Stampers ~ Watercolour Challenge. Our challenge is always


Here's my card


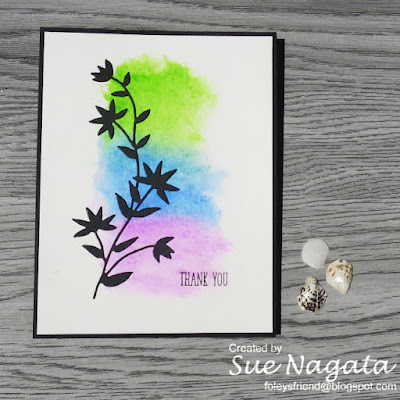
If you're thinking this card is familiar. You're right. I used the same colours as I did last month with this card.


In fact, I just didn't put the Zig Clean Color Real Brush markers - Cornflower Blue, Light Green and Light Violet away. I scribbled each of the colors on a panel of 140lb Strathmore Watercolor paper and used a water brush to move the colors around. When I was happy with the result, I put the panel aside to dry. I die cut using black cardstock and Penny Black's Flower Frolic die to give the illusion of a silhouette against the watercolored background panel. When the panel was dry, I adhered the die cut and stamped the sentiment using Clearly Besotted's Many Mini Messages. I trimmed the panel slightly and matted with a black A2 card panel before adhering it to a white A2 card base to complete my card.

We'd love to see your watercolour creations. Basically, just use water on your card somehow and it's a watercolour creation! Be sure to add it to our gallery.

Thanks for stopping by
sue

This site uses cookies from Google to deliver its services and analyze traffic. Your IP address and user-agent are shared with Google along with performance and security metrics to ensure quality of service, generate usage statistics, and to detect and address abuse.