While checking over at Less is More, where the current challenge is
I was inspired by Sarah's card
Here's my card
At first, I wasn't sure what a 'bits' box was. Then, I figured it was the box where all of my leftover stuff goes. The stuff that just didn't quite work out the way I thought or the leftover stuff when you ink up a whole card panel but only needed a strip. I dug through my 'bits' box and found this bright panel. There are lots of treasures in my 'bits' box. I should check there more often.
I think that I had inked it up with distress inks (ripe persimmon, picked raspberry and maybe abandoned coral). I then lightly spritzed up Simon Says STAMP's Bold Flower Outline stencil and applied it, wet side down onto the inked panel. I pressed the stencil down and let it sit for a few minutes before carefully removing the stencil. I've seen this technique described as stencil stamping. I inked up two small areas, one with ripe persimmon and one with picked raspberry. I brushed perfect pearls over each before diecutting with Paper Smooches Balloons dies. I stamped the sentiment from Simon Says STAMP's Floral Bliss stamp set on a scrap of red cardstock and trimmed it. To complete the card, I used some silver baker's twine for the balloons strings and a scrap of striped colored printed paper.
Thanks for stopping by
sue
Thursday 28 June 2018
AAA Cards: CAS Game # 118
I was inspired by the current challenge at AAA Cards
Here's my card
I started with a white card base and lightly marked with a pencil, a rectangle roughly 3" x 3". Then, I stamped a variety of small flowers and leaves using Hero Arts inks (Butter Bar, Orange Soda, Field Greens, Passion Flower, Tide Pool, Pale Tomato) within the rectangle. Once complete, I carefully erased the pencil marks and drew a frame, not worrying too much if the lines weren't perfectly straight. I die cut from a scrap of black cardstock, the word "thanks" using Simon Says STAMP Script Thanks die and adhered it in the middle of the frame.
Thanks for stopping by
sue
Wednesday 27 June 2018
CAS(E) this Sketch # 277
Found another sketch challenge. This time it's at CAS(E) this Sketch. Here's the sketch.
Here's my card
This is a one layer card. I used the Hero Arts Spring Hello by Lia stamp set, Hero Arts inks (emerald green, cornflower, grape juice, strawberry, orange soda, butter bar) and my regular sized MISTI. I have found that it was easiest for me to position the card into the corner of the MISTI, place the stamp, ink the stamp, stamp (by closing the lid) and then re-position the card by 0.5" each time. Of course, I cleaned the stamp each time before re-inking with a new color. In this way, I didn't have to fuss with the lining up of the stamped images. I would have never attempted something like this without the MISTI. For the sentiment, I used Hero Arts charcoal ink.
Thanks for stopping by
sue
The Paper Players PP#399
I love sketch challenges. They provide me with enough direction to help me get inspired but are "loose" enough that i could use whatever supplies I have (or can find!). There's a sketch challenge at The Paper Players
Here's my card
I started with a kokeshi doll stamp from a stamp set I purchased several years ago and have no idea what company or what the name of the stamp set is. I stamped the image with Memento Tuxedo Black ink and added color with Copic markers. The sentiment is from Lawn Fawn's Let's Roll stamp set, punched out with a 1.5" circle punch and matted with purple using a Spellbinders scalloped circle die. For the background, I used Darice's Bamboo embossing folder with dark green cardstock.
Thanks for stopping by
sue
Tuesday 26 June 2018
The Merry Christmas Challenge #26
UGH! I missed the "deadline" to post last week with the "odds", so I'm joining in with the "evens" this week. It's time for another challenge at The Merry Christmas Challenge where the challenge is
Actually, there are going to be some changes here at The Merry Christmas Challenge after this challenge. We're going from a weekly challenge to monthly challenges, posted on the 15th of each month and there will be no optional themes - just Anything Goes + Christmas.
Here's my card
OK - so it's a bit of a stretch to think that I used the optional theme. However, there IS a star! I started with Simon Says STAMP's Color Me Trees stamp set, which I stamped with Versafine Onyx Black ink on 96lb bristol. I added color with my Gansai Tambi Pearl Colors paint and a fine paint brush. I just love the shimmer these paints make. Here's a close-up
I fussy cut the trees and STAR. The sentiment is from Hero Arts' Winter Silhouettes stamp set where it was heat embossed with silver embossing powder on a black card panel. I adhered the tree and STAR with some liquid glue.
Thanks for stopping by
sue
Anything Goes + Christmas
(optional: star)
Actually, there are going to be some changes here at The Merry Christmas Challenge after this challenge. We're going from a weekly challenge to monthly challenges, posted on the 15th of each month and there will be no optional themes - just Anything Goes + Christmas.
Here's my card
OK - so it's a bit of a stretch to think that I used the optional theme. However, there IS a star! I started with Simon Says STAMP's Color Me Trees stamp set, which I stamped with Versafine Onyx Black ink on 96lb bristol. I added color with my Gansai Tambi Pearl Colors paint and a fine paint brush. I just love the shimmer these paints make. Here's a close-up
I fussy cut the trees and STAR. The sentiment is from Hero Arts' Winter Silhouettes stamp set where it was heat embossed with silver embossing powder on a black card panel. I adhered the tree and STAR with some liquid glue.
Thanks for stopping by
sue
Monday 25 June 2018
Atlantic Hearts Sketch Challenge #270
Happy new week. It's time for a new challenge at Atlantic Hearts Sketch Challenge. Here's the sketch
Here's my card
I started by stamping the floral image using Stampin' Up's Artistically Asian stamp set using my MISTI. I added color with Zig Clean Color Real Brush markers (one color at a time) and spritzing with a fine spray of water before stamping onto 96 lb bristol. It gives a watercolor look to the image. I trimmed the panel to 3.75" x 2.75". I added the sentiment from Simon Says STAMP's Lots of Thanks stamp set with Hero Arts charcoal ink. I matted the panel with red cardstock and found a strip of plaid printed paper for my vertical element. A bit of organza ribbon tied into a bow, completes the card.
We'd love to see what you create starting with this week's sketch.
Thanks for stopping by
sue
a2z Scrapbooking - June 25th post
I'm up on the a2z Scrapbooking blog. It's going to be my last post as a member of the design team at a2z Scrapbooking. The current challenge is
Here's my card
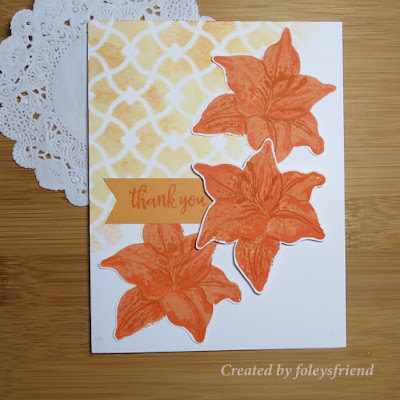
I stuck to the monochrome challenge. I started with Hero Arts SA116 Scrollwork Stencil and added color with spiced marmalade and an ink blending tool, stamping off once for a muted look. I only inked up the upper left corner of the card base. Next, I stamped using Hero Arts CM264 Color Layering Tiger Lily stamp set. I used Hero Arts Orange Soda, Tangerine and Stampin' Up Pumpkin Pie inks for each of the three layers. Of course, using my MISTI, made the layering pretty easy. I fussy cut the flowers out. The sentiment was stamped onto a scrap of orange cardstock. When completing the card, I adhere two of the flowers directly onto the card base. The middle flower, I popped up with dimensionals.
We'd love for you to join us - there are a couple of days left.
Thanks for stopping by
sue
Friday 22 June 2018
Less is More Challenge #373
Loved the current theme challenge at Less is More, that I had to make two cards.
I'm so grateful for the friendships that I have with people, mostly online. I call them my imaginary friends because they live in my laptop. However, I have had the opportunity to meet some of them at crafty retreats in TX and VA. They are the people I can count on - when I need a shoulder to lean on. When i saw the current them challenge, I was inspired to make a couple of cards which I can send to some of these imaginary friends to thank them for being there for me.
Here are my cards
For both cards, I used Catherine Pooler's Giggles stamp set for the flowers and leaves and Catherine Pooler's Everyday Mod for the sentiment. I used Hero Arts inks for both cards.
Thanks friends for stopping by
sue
Thursday 21 June 2018
STAMPlorations 5th Birthday Blog Hop - STAMPgirl post
I'm so very honoured to be one of the STAMPgirls at STAMPlorations. This month, we were invited to participate in STAMPlorations 5th Birthday Blog Hop. Who could resist an opportunity like this one - certainly not me.
I created one new card for the blog hop
For this card, I started by randomly stamping birthday gifts from STAMPlorations Party Mates stamp set, on a card panel with Hero Arts Soft Granite ink. I colored in the gifts using Copic markers. I then stamped STAMPlorations Typografia in Faith - Every Perfect Gift stamp with Hero Arts Charcoal ink. I like to think of each of the individual gifts on my card as a gift from God - sunshine, good health, time to craft, good friends - you get the idea. I believe that it's important to remember that He provides for us.
Here are three of my favorite STAMPlorations cards
For our challenge this month, we're inviting crafters to CASE one (or more) of our cards and post here (you'll need to scroll down to the end of the post). Will you be one of five lucky crafters who CASE a STAMPgirl's card to win a $50 gift certificate to the STAMPlorations store? If you're shopping at the STAMPlorations store, please use my code STAMPGIRLSUE for 20% off your purchase.
Thanks for stopping by
sue
Wednesday 20 June 2018
CAS(E) this Sketch #276
I love sketches. They give me a starting place, especially when I'm stuck. I have quite the collection of stamps, stencils and dies. So typically, I can find something that will work. Here's the current sketch at CAS(E) this Sketch
Here's my card
I flipped the sketch upside down. I started by inking up part of Hero Arts Mermaid Sea Waves stencil with distress inks (cracked pistachio, peacock feathers, mermaid lagoon) onto a card panel. Then on some scrap white cardstock, I stamped the three fish from The Alley Way's Sea Mates stamp set with Memento Tuxedo Black ink. I added color with Copic markers and fussy cut them out. I added Glossy Accents to the eye of one of the fish. Side note - you know those plastic string things that hold price tags on clothing? Well, I have found that by sticking one into the opening of a glossy accents bottle, that every time I need to use it, the glossy accents flows out nicely. I don't have to use a needle to unclog the bottle. OK, PSA over. The sentiment is from Simon Says STAMP Best Fishes stamp set, stamped with Hero Arts Tide Pool ink. The card panel was matted with teal cardstock.
Thanks for stopping by
sue
Monday 18 June 2018
Atlantic Hearts Sketch Challenge #269
Start of a new week so it must be time for a new challenge at Atlantic Hearts Sketch Challenge. Here's this week's sketch. Won't you join us this week?
Here's my card
I started with a scrap of a background I made with distress oxides (broken china, salty ocean, faded jeans) and glossy cardstock. I smooshed the ink onto a craft mat, spritzed a bit of water and then moved the cardstock through the ink. I heat set the ink after each color and kept adding more layers until I was happy with the look. I used my Stampin' Up's Ornate Tag Topper punch to make the tag and finished the tag with some silver cord. I stamped various fish using The Alley Way's Sea Mates using Memento Tuxedo Black ink and added color with Copic markers. I fussy cut the fish out and added glossy accents to the bottom fish's eye. The sentiment uses both Simon Says STAMP's Best Fishes and Your Next Stamp's Happy Everything stamp sets.
Thanks for stopping by
sue
Sunday 17 June 2018
Muse Challenge #270
Like the post before this, I'm rushing to finish my card and post it here on my blog. I started it last Wednesday. Where does the time go? I had such good intentions with this card, started it early BUT I just finished it. I need to complete the cards when I start them and post them here on my blog, right away! It's time for a new challenge at Muse Challenge. This week's Muse card was created by Tracey McNeely
I was inspired by:
Here's my card
I started with WPlus9's Beautiful Bouquets: Dahlias stamped with Versafine Onyx Black ink on a gray card panel. I added color with colored pencils (or as us Canadians refer to them, as pencil crayons). For the flowers, I used three shades of pink and colored over them with white to blend the colors. For the leaves, I used two shades of green. I found the coloring to be very relaxing. Might just ink up some more panels and color them. The sentiment, stamped on a scrap of white cardstock, is from Simon Says STAMP Birthday Messages. The sentiment strip is popped up with dimensionals.
Thanks for stopping by
sue
I was inspired by:
- the floral arrangement with greenery
- the pink and green color scheme
- a birthday sentiment stamped on white, popped up
- gray card panel, colored with colored pencils
Here's my card
I started with WPlus9's Beautiful Bouquets: Dahlias stamped with Versafine Onyx Black ink on a gray card panel. I added color with colored pencils (or as us Canadians refer to them, as pencil crayons). For the flowers, I used three shades of pink and colored over them with white to blend the colors. For the leaves, I used two shades of green. I found the coloring to be very relaxing. Might just ink up some more panels and color them. The sentiment, stamped on a scrap of white cardstock, is from Simon Says STAMP Birthday Messages. The sentiment strip is popped up with dimensionals.
Thanks for stopping by
sue
CASology: Week 304
It's incredible how fast days go by. I see various challenges online and think that I have a few days to make a card, take a photo and write a blog post. Then "poof", it's close to the deadline and i'm rushing. I need to figure this out better. I don't need the extra stress! Well, here it is, less than 12 hours before the deadline and I'm writing this post. It's for the current challenge at CASology
Here's my card
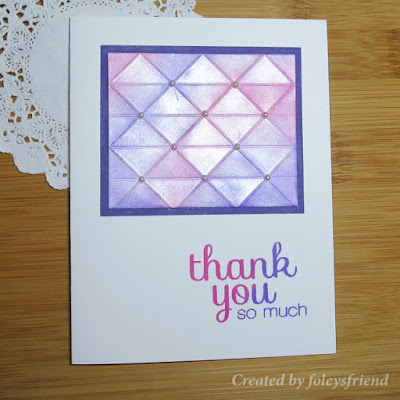
I started by inking up a small panel of cardstock with distress inks (picked raspberry and wilted violet) with ink blending tools. I then immediately brushed on some Perfect Pearls to the inked panel for some shimmer. Using We R Memory Keepers Geometric embossing folder, I added some texture and dimension to the inked panel. I matted the panel with purple cardstock. I added adhesive pearls at the intersections of the panels. Here's a close-up.
For the sentiment, I used both of the same distress inks (picked raspberry and wilted violet) to ink the sentiment, from Simon Says STAMP Flower Friend stamp set.
Thanks for stopping by
sue
Wednesday 13 June 2018
Time Out Challenge #111
Joining in at Time Out Challenges for their current challenge
Here's my card
I chose to add the optional twist - one layer card onto my Christmas holiday card. I started with Gina K's Wreath Builder bundle - well, the stencil part (again). I used the holly leaves and berries from Hero Arts Bird Words stamp set inked with Hero Arts Field Greens and Pale Tomato inks. The little sprigs are from Hero Arts Color Layering Joy Message stamp set inked with Hero Arts Green Hills ink. The sentiment is from The Alley Way's Mistletoe Kisses stamp set.
Thanks for stopping by
sue
AAA Cards - CAS Game # 117
When I saw the current challenge at AAA Cards, I knew right away what I was going to do.
Here's my card
At the Stamp & Scrapbook Expo in Puyallup, I saw a demonstration using Gina K's Wreath Builder bundle. It was so awesome that I just had to purchase it. There was a sample that resembled a spirograph (anyone old enough to remember spirograph?) pattern. I tried to re-create it. I started with a 4" square panel. I used my regular size MISTI, stamped the dotted circle alternating with Hero Arts Fresh Peach and Soft Cantaloupe inks as I rotated the square panel using the stencil in the Wreath Builder bundle. I matted the panel with some bright blue for "pop" and then with dark gray. For the sentiment, I used Paper Smooches Salutations stamp set, stamped onto a scrap of the bright blue and then popped up with dimensionals.
Thanks for stopping by
sue
CAS(E) this Sketch #275
Greetings! I have a card for the current challenge at CAS(E) this Sketch. I love working with sketches. They provide me with a starting point for my creativity. Here's this week's sketch
Here's my card
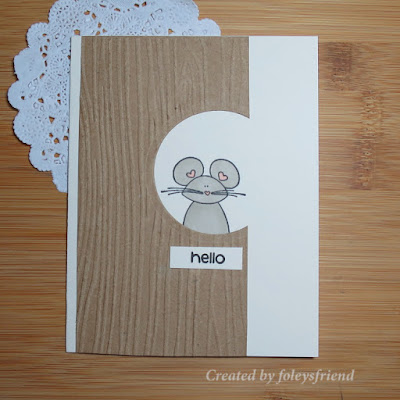
I started by embossing a card panel of kraft cardstock with my Sizzix/Stampin' Up's Woodgrain embossing folder. I trimmed it to 3" and with a sizzix circle die, cut the little "peek hole" in the woodgrain strip. Using my MISTI, I positioned the cute mouse from Unity Stamp's meow, purr, baa stamp set to where it would be in the "peek hole". I stamped the mouse on natural cardstock with Memento Tuxedo Black ink and colored it in with Copic markers. I adhered the woodgrain strip over the mouse. The sentiment is from Paper Smooches Word Salad stamp set.
Thanks for stopping by
sue
Monday 11 June 2018
Atlantic Hearts Sketch Challenge #268
It's a new week so it's time for a new sketch at Atlantic Hearts Sketch Challenge. Here's the sketch
Here's my card
I started with distress oxides (worn lipstick, picked raspberry) and some glossy cardstock. I smooshed the ink on my craft sheet, spritzed a bit of water and dabbed the glossy cardstock into the ink in a random pattern. I dried each layer of color (each color separately) with my heat tool. I continued until I liked the marble-like effect of the colors. I die cut using Simon Says STAMP's Bird of Roses die to create the bird. I stamped using the branch of leaves from Paper Smooches' Reflections stamp set with Hero Arts Field Greens ink. The sentiment is from Hero Arts Layered Topiary stamp set, stamped with Hero Arts Charcoal ink. I adhered the bird using a glue pen. I matted the card panel with dark gray.
We'd love to see what you create using this week's sketch.
Thanks for stopping by
sue
Sunday 10 June 2018
CASology: Week 303
It's time for a challenge at CASology where this week's cue card is
Here's my card
In full disclosure, I think that sheep are my only farm animal stamp I own. It's because my sister, had a stuffed lamb, she adored. She still loves all things sheep. When I see new "sheep/lamb" stamp sets, I just have to add them to my collection. This card will be her birthday card. I started with Reverse Confetti's all about ewe stamp set. I stamped the sheep with Memento tuxedo black ink on white cardstock. I added a bit of color with Copic markers. I fussy cut the sheep. I dusted off my Creative Memories 12" decorative trimmer and cut a wavy mask which I used to create the hilly field using shabby shutters distress ink, applied with an ink blending tool. I added the fence, using Stampin' Up's Chocolate Chip ink and added some "woodgrain" with Stampin' Up's Chocolate Chip marker. The sentiment, from the same stamp set, was added to the top of the card.
Thanks for stopping by
sue
Friday 8 June 2018
Into the Woods Blog Hop
Welcome to the
Into The Woods Blog Hop
This is a blog hop featuring projects inspired by the great outdoors and our woodland critters!!
This is a one day blog hop, but you have until Sunday at 10pm to finish hopping and leaving your love for all of these talented crafters.
We have an awesome sponsor for this hop!!
One lucky winner is going to win 4 dies from Cheapo Dies!!
What do you need to do to win? Easy... become a follower of each of the fabulous blogs in this hop and leave each of them a comment letting them know what you like best about their projects.
You will have until 10 pm Sunday to finish the hop and leave your comments on every blog to be eligible to win.
Winners will be announced on Wednesday 6/13/18 at Connie Can Crop.
Be sure to follow everyone and leave a comment along the way!
Here's my card
I looked through my stamps searching for a woodland critter. I found this cute fox from Poppy Stamps Christmas Friends stamp set. I stamped it with Memento Tuxedo Black ink and colored it in with Copic markers. Using a 1.5" circle punch, I cut out the fox's head and used some brown chalk ink to ink the edges. For the sentiment, I stamped using Lawn Fawn's Chit Chat and fussy cut the speech bubble. For the background, I used kraft cardstock and Sizzix/Stampin Up's Woodgrain embossing folder for texture. Here's a close-up.
Here's our line up in case you get lost along the way.
Sue- https://foleysfriend.blogspot.com <<<that's me
Miranda- http://www.nanasscrapspot.com
Thursday 7 June 2018
AAA Cards - CAS Game #116 - The Big 4th Birthday Bash
Who doesn't love a birthday party? There's a party going on at AAA Cards to celebrate their 4th birthday party.
Here's my "birthday" card
While attending last weekend's Stamp and Scrapbook Expo in Puyallup Washington, I watched a demo of Gina K's Wreath Builder Bundle. It truly makes creating wreaths or other repetitive patterns so easy. I used the 4" square stencil and a few of the stamps from the stamp set to make this card, along with Hero Arts inks (pale tomato, field greens, orchid, soft granite). The sentiment and decorative circle are from the same stamp set.
Happy Birthday to AAA Cards.
Thanks for stopping by
sue
Tuesday 5 June 2018
The Merry Christmas Challenge #23
It's time for another challenge at The Merry Christmas Challenge where the challenge is always
Anything Goes + Christmas
(optional: polka dots)
Here's my card
I love stencils - I find them usually pretty easy to use. I started this card with a Newton's Nook Holiday Foliage stencil and added distress inks (twisted citron, peeled paint, shabby shutters, abandoned coral, ground espresso) with ink blending tools. I was grateful for a fair amount of space between the images so it made it easier to keep the ink colors where I intended them to go. I added a vellum sentiment strip, which had the sentiment gold heat embossed. The sentiment is from Paper Smooches Christmas sampler stamp set.
Would love for you to join us this week.
Thanks for stopping by.
sue
Monday 4 June 2018
Atlantic Hearts Sketch Challenge #267
It's time for another sketch challenge at Atlantic Hearts Sketch Challenge
Here's my card
I started by stamping a light bulb and the sentiment using Unity Stamps' Glowing and Beautiful stamp set with Memento Tuxedo Black ink. I added color to the light bulb with Copic marker Y17 and fussy cut the light bulb. The sentiment, I trimmed and matted with black to make it pop. I found some patterned paper that had the yellow-orange colors as well as a strip of solid cardstock to complete the card.
Would love to see what you create using this week's sketch.
Thanks for stopping by
sue
Subscribe to:
Posts (Atom)