Wednesday, 31 May 2023

Happy Little Stampers ~ June Watercolour Challenge

Hope you're ready for a new challenge at Happy Little Stampers ~ Watercolour Challenge.


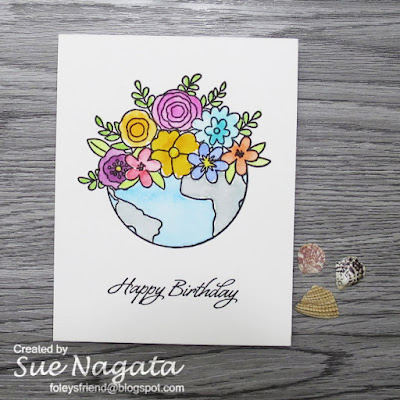
Here's my card


What do you think? Are my colours bright enough to be considered "bright", which is the optional twist to our challenge this month. I say, yes! The colours are pretty bright - they aren't subdued or pastel! For my card, I started with an A2 panel of 96 lb bristol paper. I used Penny Black's Flower Pageant cling stamp. I placed it in my MISTI and added colour with Zig Clean Color Real Brush Markers - fluorescent green, red, cobalt blue, light violet. I added colour, one at a time and spritzed the inked area with water before applying the stamp to the watercolour paper. Any excess water, I picked up with a dry cloth. I feel like this technique makes it look like you know what you're doing when it comes to watercolour. In reality, it couldn't be simpler. I die cut the panel with a die using Waffle Flower's Additional A2 Layers dies. I also die cut the black border with a die using Waffle Flower's A2 Layers dies. I stamped the sentiment, using Papertrey Ink's Keep It Simple: Thank You stamp set and Versafine Onyx black ink. I adhered the finished panel to a full-sized A2 panel of 96 lb bristol and then to a white A2 card base. 

We'd love to see your watercolour cards in our gallery this month. 

Thanks for stopping by
sue

This site uses cookies from Google to deliver its services and analyze traffic. Your IP address and user-agent are shared with Google along with performance and security metrics to ensure quality of service, generate usage statistics, and to detect and address abuse.

Die Cut Divas ~ Last Day of our May Challenge

This month, we're happy to have Frantic Stamper as our sponsor. The winner will received these four dies. 


Today, is the last day of our May Challenge at Die Cut Divas. Our challenge this month is a tic-tac-toe challenge. 


For my card, I chose the diagonal from top left to bottom right, Flowers, the word: Love, Patterned Paper. Here's my card


I started my card by die cutting the word "love" using Frantic Stampers' Big Handwritten Love die from red cardstock. I then searched through my stash of patterned papers for something with the same red. I settled on this flowered patterned paper, which satisfies the flowers requirement and, which I cut to 5.5" x 4.25". To help the word pop, I die cut a stitched circle from natural cardstock using a My Favorite Things Stitched Circle STAX Die-namics die. I added some paper flowers with small adhesive pearls to complete the panel. I adhered the panel to a natural A2 card base to complete my card.

You still have some time to join us this month's tic-tac-toe challenge and maybe you'll win the great prize offered by Frantic Stamper.

Thanks for stopping by
sue

This site uses cookies from Google to deliver its services and analyze traffic. Your IP address and user-agent are shared with Google along with performance and security metrics to ensure quality of service, generate usage statistics, and to detect and address abuse.

Tuesday, 30 May 2023

Addicted to Stamps and More! Challenge #447

Well, it feels like summer is finally here. Now, I'm complaining that it's too hot! I'm never happy - LOL! One way, I cool down is to think about Christmas and to make Christmas cards. This is perfect for our next challenge at Addicted to Stamps and More!


Here's my card


For my card, I used Uniko's Christmas Pop Trio stencil. I used my Wendy Vecchi's Make Art STAY-tion to hold my white A2 card panel and stencil in place. I used scrap paper to help mask each color area. I added color with distress inks - candied apple, carved pumpkin, mustard seed, mowed lawn, peacock feathers, blueprint sketch, wilted violet, applied with oval ink blending brushes. For the sentiment, I used Clearly Besotted's Many Mini Messages and Concord & 9th's Dove ink. I adhered the panel to a white A2 card base to complete my card. 

Need to cool off? Why not create a Christmas card for your 2023 Christmas card stash and add it to our gallery this month? We'd love to see it.

Thanks for stopping by
sue

This site uses cookies from Google to deliver its services and analyze traffic. Your IP address and user-agent are shared with Google along with performance and security metrics to ensure quality of service, generate usage statistics, and to detect and address abuse.

Monday, 29 May 2023

Atlantic Hearts Sketch Challenge #527

It's still Monday, here on the West Coast. It's time for a new challenge at Atlantic Hearts Sketch Challenge. Here's our sketch


Here's my card


For my card, I only used patterned paper - no stamping, no ink, no stencils! Crazy, right? I used Pink and Main's Pen Pals 6x6 paper pad for my card. I chose the diagonal stripes for the background. I then chose the polka dots for the central panel. It didn't "pop" enough, so I matted with black cardstock. The sentiment element was also from the same paper pad on a sheet with sentiment boxes. For the flower element on the bottom corner of the sketch, I fussy cut some envelopes from another sheet of patterned paper from the same pad. I adhered all the pieces and then adhered it to a white A2 card base to complete my card. Here it is, a card make only of patterned paper from a single 6x6 paper pad. I have so much patterned paper. I should do this more often and actually use some! LOL!

We'd love to see how you're inspired by our sketch.

Thanks for stopping by
sue

This site uses cookies from Google to deliver its services and analyze traffic. Your IP address and user-agent are shared with Google along with performance and security metrics to ensure quality of service, generate usage statistics, and to detect and address abuse.

Tuesday, 23 May 2023

Try Stampin' On Tuesday ~ Challenge #608

It's Tuesday so it must be time for a new challenge at Try Stampin' On Tuesday

Optional: Create a Scene


Obviously, I rotated the sketch 90 degrees and created a little scene. I inked up a white panel with distress inks - candied apple, carved pumpkin, mustard seed, mowed lawn, peacock feathers, applied in rainbow order with oval ink blending brushes. I stamped the tree tops using Gina K Design's Friendly Silhouettes Stamp Set. I added the birds using Lavinia Stamps' Birds stamp. I die cut the panel using a die from Echo Park Stitched Oval Nesting die set. I used some scraps of cardstock to make the vertical elements. I used a die from Simon Says STAMP's Scallop Stitches wafer dies to make the green scalloped element. I felt that the elements looked best on a black panel. So I heat embossed with silver embossing powder on a black A2 panel using Clearly Besotted's Many Mini Messages stamp set. I adhered all the elements to the panel and then used double-sided tape to attach the panel to a white A2 card base to complete my card.

We'd love to see how you're inspired by our sketch. 

Thanks for stopping by
sue

This site uses cookies from Google to deliver its services and analyze traffic. Your IP address and user-agent are shared with Google along with performance and security metrics to ensure quality of service, generate usage statistics, and to detect and address abuse.

Saturday, 20 May 2023

Addicted to CAS ~ Challenge #238

It's time for a new challenge at Addicted to CAS. It's a good one this fortnight. 

Our code word is

FREEDOM

I admit it. I was stumped. I wasn't sure what to do. I thought about a balloon flying away or maybe a hot-air balloon. I thought about soldiers who fight for our freedom. I thought about a July 4th inspired card. I settled on this idea. Here's my card.


For my card, I started with the dove from Paper Smooches' A Blessed Christmas stamp set. I stamped the dove with Memento Tuxedo Black ink and added a bit of color with Copic B00 and G82. I then fussy cut the image. I used a Sizzix circle die to make a mask from a large post-it note. I put the post-it note in place and added the clouds using Simon Says STAMP's Clouds for Days stencil and distress inks - blueprint sketch, seedless preserves, picked raspberry, mustard seed, peacock feathers, applied with oval ink blending brushes. I carefully removed the mask. For the sentiment, thinking again about the FREEDOM code work, I used a STAMPlorations clear sticker from the New Day pack. I adhered the panel to a white A2 card base to complete my clean and simple card.

We'd love to see how our code word inspires you. We'd love for you to join our gallery.

Thanks for stopping by
sue

This site uses cookies from Google to deliver its services and analyze traffic. Your IP address and user-agent are shared with Google along with performance and security metrics to ensure quality of service, generate usage statistics, and to detect and address abuse.

Tuesday, 16 May 2023

Addicted to Stamps and More! Challenge #446

There is a new challenge at Addicted to Stamps and More! starting today. It will last a fortnight. Our challenge is


Here's my card


For my card, I used a technique that I call faux watercoloring. I apply ink to a stamp and spritz the stamp with a bit of water before stamping. The result is a watercolor-like image with variations in depth of color and detail. I used Penny Black's Flower Pageant stamp set for this card in my MISTI. I added color with Zig Clean Color Real Brush Markers, lightly spritzed with water and stamped on 96 lb bristol. Some areas didn't "stamp" well, so I repeated the process. I let the panel dry and then die cut it with a Waffle Flower Additional A2 Layers die. I matted with a light gray A2 card panel. For the sentiment, I used Papertrey Ink's Keep It Simple: Thank You stamp set and Concord & 9th's Dove ink. I adhered the panel to a white A2 card base to complete my card.

We'd love to see how you made a mark on your card - marker, ink, paint, pen, colored pencil? You decide and we look forward to seeing your creation in our gallery.

Thanks for stopping by
sue

This site uses cookies from Google to deliver its services and analyze traffic. Your IP address and user-agent are shared with Google along with performance and security metrics to ensure quality of service, generate usage statistics, and to detect and address abuse.

Monday, 15 May 2023

Atlantic Hearts Sketch Challenge #525

Halfway through May already. Time has sped up. It's crazy. Before I know it, it's going to be Christmas and I have a ton of stuff to do before Christmas!

It's Monday so it's time for a new challenge at Atlantic Hearts Sketch Challenge


Here's my take on the sketch


For my card, I started with a set from Scrapbook & Cards Today that came with the kit for Crop & Create Delivered - October 2021. I stamped the main image with Versamark ink on 140 lb Strathmore Watercolor paper. I added color using a paint brush, some water and distress inks - salty ocean, blueprint sketch, peacock feathers, picked raspberry, ripe persimmon, candied apple, carved pumpkin, twisted citron, mowed lawn, seedless preserves, wild honey, fossilized amber, weathered wood. I smooshed some distress ink on a plastic place mat and with a slightly wet paint brush, picked up the ink and added it to the stamped image. I intentionally left little slivers of white space. I think it looks cool like that. For the sentiment, I used Paper Smooches Salutation stamp. I trimmed the watercolor paper to A2 size and then adhered it to a white A2 card base to complete my card.

We'd love to see how you're inspired by our sketch. Please add your creations to our gallery.

Thanks for stopping by
sue

This site uses cookies from Google to deliver its services and analyze traffic. Your IP address and user-agent are shared with Google along with performance and security metrics to ensure quality of service, generate usage statistics, and to detect and address abuse.

Tuesday, 9 May 2023

Try Stampin' On Tuesday ~ Challenge #606

Do you ever look at a card sketch and think, I know exactly what to use? Well, it happened this time. It doesn't happen often at all. I find that I flip through my stamps, stencils, patterned papers, dies to look for inspiration. However, for the next challenge at Try Stampin' On Tuesday, I was inspired! Here's the sketch

optional theme: use dies &/or punches

Here's my card


I obviously changed the square for a circle element and used a die, which satisfies the optional theme. In this case, I used Scrapbook & Cards Today Change the World stamp and die set, which I received as part of the kit for Crop & Create Delivered ~ October 2021. I inked up the stamp with Versamark ink on white cardstock and used white embossing powder which I heat set. I added color with distress inks - picked raspberry, spiced marmalade, mustard seed, mowed lawn, blueprint sketch, applied with oval ink blending brushes. With a dry cloth, I removed any ink from the heat embossed sections. I die cut the image using the die from the set. I then went through some of my patterned papers, looking for papers that I could use for the horizontal strips. I chose to use simple strips of paper for the background, which was glued to a light blue A2 card panel. For the sentiment, I used the same stamp set, stamped with PinkFresh Studio's Sparking Rose ink and fussy cut. I popped up the focal image for a bit of added dimension.

We'd love to see your creations inspired by our sketch in our gallery.

Thanks for stopping by
sue

This site uses cookies from Google to deliver its services and analyze traffic. Your IP address and user-agent are shared with Google along with performance and security metrics to ensure quality of service, generate usage statistics, and to detect and address abuse.

Die Cut Divas ~ Tic Tac Toe with Frantic Stamper

This month, we're happy to have Frantic Stamper as our sponsor. The winner will received these four dies. 


Our challenge this month is a tic-tac-toe challenge. 


Here's my card. I chose the middle row - ribbon, the word: Love and heart.


Thanks to Frantic Stampers' Love Heart die, this card was relatively easy to put together with the characteristics of the middle row. I started by making my own piece of colored paper. I used a scrap of 96 lb bristol and randomly scribbled Zig Clean Color Real Brush Markers in pink, carmine red, red, peach pink. With a water brush, I diluted the ink and moved the ink around. When I was happy with the result I let the panel dry. I then die cut using the aforementioned Love Heart die. I glued it onto pink cardstock, that had been die cut using a My Favorite Things' Stitch Square STAX die-namics die. For my ribbon, I looked through my stash and found this gray lacy-type ribbon that added some nice texture to my card. I cut the ribbon extra long and attach it to the reverse side. I find that hides any fraying that may occur. I adhered everything to a light gray A2 card panel which was then glued to a white A2 card base to complete my card. 

We'd love to see you creations, following our tic-tac-toe grid in our gallery this month.

Thanks for stopping by
sue

This site uses cookies from Google to deliver its services and analyze traffic. Your IP address and user-agent are shared with Google along with performance and security metrics to ensure quality of service, generate usage statistics, and to detect and address abuse.

Monday, 8 May 2023

Happy Little Stampers ~ Anything Goes with Dies ~ May Challenge

This is the last card for May Challenges at Happy Little Stampers. This time, it's for the Anything Goes with Dies Challenge. Our challeng is always


Last month, I posted this card


When I was making it, I didn't really have a plan and made several of the die cuts. So, this month, I thought I use the extras, before I lost them or damaged them. Here's my card


Again, I used the inlaid die cut technique. I used Memory Box's Aubrey Bloom set. I cut three of the die cuts for this card. I added ink with distress inks - ripe persimmon and bundled sage, applied with mini ink blending brushes. For the background, I chose a light blue A2 card panel. I stamped the sentiment from Simon Says STAMP's Lots of Thanks stamp set with Gina K Design's Grass Green ink. I carefully die cut the panel three times. I adhered a white A2 panel behind the light blue and glued the die cuts into the opening and onto the white A2 panel. To complete my card, I used double sided tape to attach the panel to a white A2 card base.

We'd love for you to join us this month. Grab a die or dies and cut some paper and see where it leads you.

Thanks for stopping by
sue

This site uses cookies from Google to deliver its services and analyze traffic. Your IP address and user-agent are shared with Google along with performance and security metrics to ensure quality of service, generate usage statistics, and to detect and address abuse.

Saturday, 6 May 2023

Happy Little Stampers ~ Stencil Challenge - May 2023

I love working with stencils. Artists have done the hard work and all I have to do is add color. Stencils tend to be more affordable - well, until the addition of layering stencils came along. If you're like me and like working with stencils, then our challenge at Happy Little Stampers ~ Stencil Challenge is for you. If you haven't played with stencils in awhile, why don't you dust them off (LOL!) and join us. Our challenge this month is


Here's my card


For my card, I used Clearly Besotted's Splish Splash stencil. I used by Wendy Vecchi's mini Make Art STAY-tion to hold my white A2 card panel and stencil in place. I added color with distress inks - peacock feathers, mermaid lagoon, salty ocean, applied with oval ink blending brushes. I added the fish using Simon Says STAMP's Best Fishes stamp set and Versafine Onyx Black ink. For the sentiment, I used Sunny Studio's Oceans of Joy stamp set. I adhered the white panel to a white A2 card base with double sided tape to complete the card.

We'd love for you to play with stencils and add your cards to our gallery this month.

Thanks for joining us
sue

This site uses cookies from Google to deliver its services and analyze traffic. Your IP address and user-agent are shared with Google along with performance and security metrics to ensure quality of service, generate usage statistics, and to detect and address abuse.

Addicted to CAS ~ Challenge #237

I'm grateful for the time I get to play at my craft table. Playing with paper, inks, stamps, stencils and dies, really make me happy. Spending hours crafting is my joy! Hoping you find some time to craft.

We have a new challenge to hopefully inspire you, at Addicted to CAS. Our challenge for the next fortnight is

MONOCHROME

Here's my card


When companies have cardstock that matches with their inks, well, it makes creating monochromatic cards much easier. In my case, I used Stampin'Up's Coral Calypso ink and cardstock for my card. On some Coral Calypso cardstock, I stamped using Impression Obsession Cover-a-card Flourishes stamp with Coral Calypso ink. I like the tone on tone look when you stamp using the ink that matches the cardstock. A similar look is achieved if you stamp with Versamark ink. I cut a strip that measures 1.5" x 5.5" for my card. I then stamped using Gina K Design's A Beautiful World stamp set that came in a Catherine Pooler Stamp of Approval box, with Coral Calypso ink onto white cardstock. I also stamped the sentiment from the Simon Says STAMP's It's Your Birthday stamp set with Coral Calypso onto the white cardstock. I trimme the white cardstock to 3" x 4". I matted with Coral Calypso cardstock, with a thin border to make the white stamped panel stand out. I adhered the inked strip and inked panel to a white A2 cardbase to complete my card.

We'd love to see your monochrome cards in our gallery this fortnight. Hmm - what color will you use? Blue? Green? Red?

Thanks for stopping by

sue


This site uses cookies from Google to deliver its services and analyze traffic. Your IP address and user-agent are shared with Google along with performance and security metrics to ensure quality of service, generate usage statistics, and to detect and address abuse.

Thursday, 4 May 2023

Happy Little Stampers ~ Christmas Challenge - May 2023

As the outside temperatures warm up, it's fun to think about Christmas because it will be here before we know it. We have a challenge that can help you get a start on your Christmas 2023 cards here at Happy Little Stampers ~ Christmas Challenge


For my card, I didn't incorporate the optional theme to my card. Here's my card.


I had an idea in my head and couldn't find my oval stencil/mask. I created one by die cutting an oval using a die from Echo Park's Stitched Oval Nesting die set and a large post-it note. I placed the post-it note on a white A2 card panel. I added the sky with distress inks - black soot, chipped sapphire, wilted violet, mustard seed applied with oval ink blending brushes. I stamped the little village using Paper Smooches' A Blessed Christmas with Versafine Onyx Black ink, with the post-it note still in place. I heat embossed a star using the same stamp set and gold embossing powder. The sentiment is also from the same stamp set. I trimmed the panel down slightly so it could be matted with black. I adhered the panel to a white A2 card base with double sided tape.

We'd love to see your creations in our gallery this month. 

Thanks for stopping by
sue

This site uses cookies from Google to deliver its services and analyze traffic. Your IP address and user-agent are shared with Google along with performance and security metrics to ensure quality of service, generate usage statistics, and to detect and address abuse.

Tuesday, 2 May 2023

Addicted to Stamps and More! ~ Challenge #445

Ready for a new challenge at Addicted to Stamps and More! It's time.


Here's my card


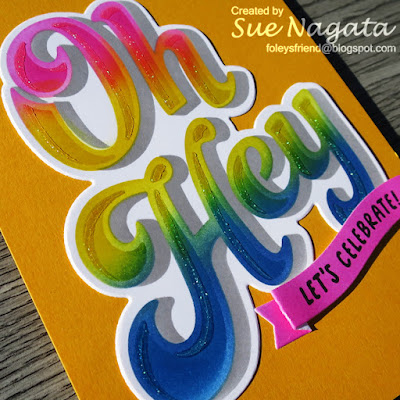
I happily participated in Crop & Create Delivered - September 30 - October 2, 2022. I was inspired by the class by Cathy Zielske using Concord & 9th's products. For my card, I used Concord & 9th's Oh Hey stencils (set of 4), the Oh Hey wafer dies and the Oh Hey Greeting stamps. When I stenciled on white cardstock, I used distress inks (picked raspberry, mustard seed and faded jeans) applied with oval ink blending brushes, for the first stencil. For the second stencil, the shadow, I used Concord & 9th's Dove ink, again applied with an oval ink blending brush. For stencil 3, I used the same distress inks, just applied with a heavier hand. For stencil 4, I used Scrapbook.com's Pops of Color - Snowflake Glitter and quickly washed that stencil after I applied the Pops of Color with a palette knife. Here's a close up


For the sentiment, I stamped it on white cardstock and then ink blended the picked raspberry distress ink over top (so the colors would match). Then I used the coordinating die to die cut the banner. I chose to glue the elements to a goldenrod A2 card panel. When gluing the banner, I placed a couple of foam dimensionals to give it some height. To complete my card, I used double sided tape to adhere the panel to a white A2 card base.

We'd love to see your die cut/stencil creations in our gallery.

Thanks for stopping by
sue

This site uses cookies from Google to deliver its services and analyze traffic. Your IP address and user-agent are shared with Google along with performance and security metrics to ensure quality of service, generate usage statistics, and to detect and address abuse.

Happy Little Stampers ~ May Birthday Challenge

It's nice to have a stash of birthday cards to send or give to friends and family on their special day. We'd love for you to join our next challenge at Happy Little Stampers ~ Birthday Challenge


Here's my card


For my card, I started by stamping the cute bird using Paper Smooches Birthday Buddies stamp set and the balloons using Paper Smooches PS Stamptember 2014 and Technique Tuesday's Smirthday stamps set with Memento Tuxedo Black ink on scraps of white cardstock. I added color with Copic markers - BG05, BV04, G07, R11, Y17, YR07. I fussy cut the images out. I added a bit of Glossy Accents to the bird's eyes for a bit of shine. I found some patterned paper that went with the color of the bird and cut the paper to an A2 size. I help the bird standout from the patterned paper, I die cut a stitched circle using a My Favorite Things Stitched Circle STAX die. I added some silver thread for the balloon strings. I glued all the pieces onto the card background and then adhered it with double sided tape to a white A2 card base to complete my card.

We'd love for you to join us in the gallery and you'll have another birthday card for your stash!

Thanks for stopping by
sue

This site uses cookies from Google to deliver its services and analyze traffic. Your IP address and user-agent are shared with Google along with performance and security metrics to ensure quality of service, generate usage statistics, and to detect and address abuse.

Monday, 1 May 2023

Atlantic Hearts Sketch Challenge #523

Hello Monday! Hope you're ready for another week. Well, if you're not, unfortunately I don't think there is a way to stop time. Maybe you need some crafty time. It's what I do when I'm not ready to face the world. That's me, the Introvert talking! LOL!

We have a new challenge at Atlantic Hearts Sketch Challenge for you. Here's the sketch.


Here's my interpretation of the sketch. 


I started with the sketch and then added a few creative interpretations. Instead of the diamond shapes, I used circles. I didn't incorporate two colors on the background. I felt that my card was busy enough with all the colors. For my card, I used Avery Elle Critter Circle Tags stamp set and Memento Tuxedo Black ink, stamped onto a white A2 card base. I arranged the three critters, using my MISTI and stamped. For the party hats, I used Lawn Fawn's Hats Off to You stamp set. I stamped the same party hat three times on a scrap of white cardstock with Memento Tuxedo Black ink. For the cupcake, I stamped using STAMPlorations Party Mates stamp set and again with Memento Tuxedo Black ink. I colored the images in using Copic markers (lots of Copic markers - LOL!) - B24, B93, BG05, BG23, C2, C3, C5, E21, E25, E33, E43, E47, E71, G14, R11, R29, V05, W2, Y15, Y17, 100. I fussy cut the hats and cupcake and glued them into place. The sentiment was from the Avery Elle stamp set and was stamped also with Memento Tuxedo Black ink. I trimmed the panel slightly and matted with a black A2 card panel. I adhered the panel to a white A2 card base to complete my card.

We'd love to see your interpretation of our sketch in our gallery.

Thanks for stopping by
sue

This site uses cookies from Google to deliver its services and analyze traffic. Your IP address and user-agent are shared with Google along with performance and security metrics to ensure quality of service, generate usage statistics, and to detect and address abuse.