Thursday, 31 August 2023

Happy Little Stampers ~ September Watercolour Challenge

Guess we're moving into Fall as it's now September! Time for a new challenge at Happy Little Stampers ~ Watercolour Challenge.


Here's my card


I started this card by heat embossing with white embossing powder the floral set using STAMPlorations Blossom Sprays #1 stamp set onto a light blue A2 card panel and a 96 lb bristol A2 card panel. I used my MISTI so the image is stamped in exactly the same place on both pieces of paper. I trimmed 1/2" from both the right and bottom edges of the bristol panel. I then used distress inks - mermaid lagoon, wilted violet, fossilized amber to add some color to the bristol panel. I smooshed the ink onto a plastic place mat and then picked up the ink with a wet brush. I applied the ink horizontally, attempting to add a rectangle of each of the colors over the panel, leaving roughly a 1/2" border. The two panels were adhered together with double-sided tape, making sure that the embossed images were super-imposed. For the sentiment, I stamped it using Avery Elle's Speech Bubbles stamp set with Versafine Onyx Black ink on a scrap of medium gray cardstock. I die cut the sentiment out using a Sizzix circle die. I found some shimmery chiffon ribbon to place under the die cut sentiment piece to add another layer to my card. The panel was finally adhered to a white A2 card base to complete my layered card. 

We'd love to see your watercolour cards in our gallery and I'm curious to see if your cards will have layers or not!

Thanks for stopping by
sue

This site uses cookies from Google to deliver its services and analyze traffic. Your IP address and user-agent are shared with Google along with performance and security metrics to ensure quality of service, generate usage statistics, and to detect and address abuse.

Die Cut Divas ~ Popping Up with Poppystamps

It's the final day of our August Challenge. You have until 9pm Pacific to enter our August Challenge. Our challenge this month is

POP-UP CREATIONS

Our sponsor for August is Poppystamps. They will be giving our winner a $20 gift card. Big thanks to Poppystamps for their generosity.


Here's my card


For my card, I started with a piece of 100 lb white cardstock 5 1/2" x 10 3/4" (trimming 1/4" from 5 1/2" x 11"), which I scored at 1 1/4", 2 1/4", 3 1/4", 7 1/2", 8 1/2", 9 1/2". I folded both ends so that they each created a "M" shape looking from the top (or bottom). I used Poppystamps Flower Field Corner die to emboss some yellow cardstock, which I cut to 5 1/4" x 1" strips. I needed two of those, which I glued to the front panels. For the background, I used a white A2 card panel and ink blended using mowed lawn, peacock feathers and squeezed lemonade distress inks applied randomly with oval ink blending brushes. I trimmed this panel to 4" x 5 1/4" and adhered it to the back panel. I also, ink blended a smaller piece of white cardstock with the same three distress inks. I die cut this piece with a Spellbinders Label 8 die for the background for the sentiment. I die cut the sentiment from yellow cardstock with Poppystamps Happy Birthday Poe Script die and adhered it to the die cut label. I also die cut using the Poppystamps Flower Field Corner die - twice using white cardstock for dimension and once using various scraps of cardstock. I stacked and glued the two white layers and then glued the various flowers and leaves in place. I used double-sided tape to attach both edges of the sentiment label to the yellow panels. I used some acrylic blocks to "squash" the card down to make gluing easier. I used liquid glue to glue the floral corner die cut on the edges to the yellow panels. I kept the acrylic blocks in place to allow the glue to dry. 

The card "squashes" down to fit in a regular A2 envelope.


Here's another view of the card when it's popped up


This was an interesting challenge for me. I typically prefer clean and simple so this pop-up challenge pushed me outside my comfort zone. It was fun!

We'd love to see your popped up creations in our gallery. Just remember to have them posted there by 9pm Pacific.

Thanks for stopping by
sue

This site uses cookies from Google to deliver its services and analyze traffic. Your IP address and user-agent are shared with Google along with performance and security metrics to ensure quality of service, generate usage statistics, and to detect and address abuse.

Tuesday, 29 August 2023

Try Stampin' On Tuesday ~ Challenge #622

Happy Tuesday! It's time for a new challenge at Try Stampin' On Tuesday. Here's our sketch to inspire you for the next fortnight.

Optional theme: washi tape
Here's my card


I was away at a crafting weekend when I made my card. I was limited by the supplies I had taken with me. I stamped the monster using Your Next Stamp's Way Cool Monsters. I unfortunately didn't have any markers with me to color in the monster. So, I chose to leave it uncolored and die cut it using a Sizzix circle die. To add the stripes of color to the card, I used Post-it Tape to mask the areas and added distress ink - twisted citron, carved pumpkin and peacock feathers applied with oval ink blending brushes. The sentiment was stamped using the same stamp set on a scrap of white cardstock and trimmed into a rectangle. To help separate the focal image die cut and the sentiment rectangle from the white card base, I inked the edges with distress ink. I adhered the A2 white card panel to a white A2 card base to complete my card. It was fun to create a card with the supplies I had with me. 

We'd love to see how you're inspired by our sketch. Be sure to add your cards to our gallery.

Thanks for stopping by
sue

 This site uses cookies from Google to deliver its services and analyze traffic. Your IP address and user-agent are shared with Google along with performance and security metrics to ensure quality of service, generate usage statistics, and to detect and address abuse.

Saturday, 26 August 2023

Addicted to CAS ~ Challenge #245

The last little while, my life has been pretty busy. However, sitting at my craft table making a clean and simple card is just the kind of activity I needed. Nothing better than listening to music and creating at my craft table! I made a card, in time for the next challenge at Addicted to CAS where our challenge is

HOLIDAYS

Here's my card


I chose to make a Halloween card because I think that this little monster is adorable. It's from Your Next Stamp's Way Cool Monsters stamp set. I stamped this little monster with Memento Tuxedo Black ink and added color with Copic markers - E33, E50, G14, Y06, YR04. I also stamped the sentiment onto the signboard, he's holding. I fussy cut him and put him aside for a bit. For the background, I used a white A2 card base and My Favorite Things Oval Extraordinaire stencil and salty ocean distress ink, applied with an oval ink blending  brush. I then used dimensional adhesive to glue the little monster onto the card base to complete my card. 

We'd love to see your "HOLIDAYS" creations in our gallery this fortnight.

Thanks for stopping by

sue


This site uses cookies from Google to deliver its services and analyze traffic. Your IP address and user-agent are shared with Google along with performance and security metrics to ensure quality of service, generate usage statistics, and to detect and address abuse.

Tuesday, 22 August 2023

Addicted to Stamps and More! Challenge #453

Hope you're ready for a new challenge at Addicted to Stamps and More! For the next fortnight, our challenge will be


Are you like me, always need birthday cards? Well, here's a challenge to help you build your birthday stash. Here's my birthday card


For my card, I used CTMH's Sweet Birthday stamp set. I stamped the image with Memento Tuxedo Black ink and used Copic markers - B02, RV02, Y11, YG23, YR02 to add color to the image. I then fussy cut it out. I chose to glue it to a light blue A2 card base and I stamped the sentiment from the same stamp set below the image to complete my card. It's a clean and simple birthday card, one that's easy to put in the mail.

Hope you're inspired to join us in the gallery with your birthday cards.

Thanks for stopping by
sue

This site uses cookies from Google to deliver its services and analyze traffic. Your IP address and user-agent are shared with Google along with performance and security metrics to ensure quality of service, generate usage statistics, and to detect and address abuse.

Monday, 21 August 2023

Atlantic Hearts Sketch Challenge #539

How's your Monday going? My Monday was pretty good. It's time for a new challenge at Atlantic Hearts Sketch Challenge. Here's our sketch for the next fortnight.


Here's my card


I felt that this sketch really called for patterned papers (of which I have a ton)! I chose Authentique's 6x6 bundle collection: Grace. I cut 1 1/4" squares from 8 different patterned papers from the paper pack. I arranged them on a A2 light gray card base and adhered them with double sided tape. For the larger square, which measures 2 5/8" square, I used some natural cardstock and stamped the floral image using Paper Smooches Best Buds stamp set with Concord & 9th's Dove ink. The sentiment is from Simon Says STAMP's Lots of Thanks stamp set and is also stamped with Concord & 9th's Dove ink. I added color to the flower and leaves with Prismacolor Premier colored pencils and blender pencil. 

We'd love to see how you're inspired by our sketch. Please post your card in our gallery.

Thanks for stopping by
sue

This site uses cookies from Google to deliver its services and analyze traffic. Your IP address and user-agent are shared with Google along with performance and security metrics to ensure quality of service, generate usage statistics, and to detect and address abuse.

Tuesday, 15 August 2023

Try Stampin' On Tuesday ~ Challenge #620

Do you ever feel like you're always trying to catch up? I'm supposed to be retired and taking life easily. However, it feels like I'm not enjoying my golden years like I thought. I guess that I need to learn to say "no". It feels so selfish though. When someone asks for help, why is it so hard to say "no" or maybe "not now". I just want to spend time at my craft table and listen to music. That's my happy place! OK, off my soap box and back to reality. It's time for a new challenge at Try Stampin' On Tuesday. Here's our sketch

Optional theme: add a sentiment

Here's my card and I added a sentiment which is our optional theme.


I flipped the sketch 90 degrees to the left. For my focal image, I used Paper Smooches' Birthday Buddies stamp set. I stamped the little worm with Memento Tuxedo Black ink on white cardstock and added color with Copic markers - BG09, C3, C7, E25, E29, E43, E50, G07, Y17. I used a My Favorite Things Stitched Circle STAX die-namics die to die cut the little worm. I found some patterned paper, both for behind the stitched circle die cut and for the horizontal strip. I stamped the punny sentiment from the same stamp set on a scrap of white cardstock and trimmed it into a rectangle. I adhered all the pieces to a white A2 card base to complete my card.

We'd love to see how you're inspired by our sketch by adding your card to our gallery.

Thanks for stopping by
sue

This site uses cookies from Google to deliver its services and analyze traffic. Your IP address and user-agent are shared with Google along with performance and security metrics to ensure quality of service, generate usage statistics, and to detect and address abuse.

Saturday, 12 August 2023

Addicted to CAS ~ Challenge #244

Hey Friends! It's time for a new code word at Addicted to CAS. For the next fortnight, our challenge is


Here's my card


For my card, I started with Lawn Fawn's Tropical Leaves Background stencil. It's a layering stencil with two layers. One I inked up with Abandoned Coral and Mustard Seed distress inks and the other with Twisted Citron and Cracked Pistachio distress inks. The inks were applied with oval ink blending brushes. I cut a piece of the inked background that was 3 1/4" x 2 1/4". I then cut it into three pieces 3 1/4" x 1/2", 3 1/4" x 3/4" and 3 1/4" x 1". I adhered these strips onto a white A2 card base leaving a narrow space between them. For the sentiment, I die cut some light gray cardstock with Simon Says STAMP's Painted Thanks die. I also die cut the sentiment from white cardstock which I stacked for a bit of dimension. 

We'd love to see your "leaves" creations in our gallery this fortnight.

Thanks for stopping by
sue

This site uses cookies from Google to deliver its services and analyze traffic. Your IP address and user-agent are shared with Google along with performance and security metrics to ensure quality of service, generate usage statistics, and to detect and address abuse.

Wednesday, 9 August 2023

Die Cut Divas ~ Popping Up with Poppystamps

For the month of August at Die Cut Divas, our sponsor is


They will be giving our winner a $20 gift card. Thank you Poppystamps.

Our challenge this month is

POP-UP CREATIONS

Not going to lie, this challenge isn't easy for me. I prefer one-layer, clean and simple cards. Here's what I came up with


My card doesn't "pop up" a lot - maybe 3/8". I lightly ink blended some white cardstock with distress inks - fossilized amber, ripe persimmon, candied apple. I die cut the inked cardstock with a My Favorite Things Stitched Circle STAX Die-namics. The sentiment is die cut using our sponsor's Poppystamps' Thank You Poe Script die and light gray cardstock. I adhered it to the circle die cut. For my "pop up" mechanism, I used a 3/4" x 4 1/4" strip of 100 lb cardstock that was scored at 1/2" and 1" from both sides. I used double-sided tape to attach the mechanism to the back of the circle die cut and the folded edge to the patterned paper A2 card panel. The mechanism allows the card to lie flat and go into an envelope and will "pop up" (slightly) when opened. I had a difficult time trying to get a photo. In hindsight, maybe I could have used an Action Wobbles Mini Spring.


We'd love to see your "pop up" creations in our gallery this month. I could use some tips!

Thanks for stopping by
sue

This site uses cookies from Google to deliver its services and analyze traffic. Your IP address and user-agent are shared with Google along with performance and security metrics to ensure quality of service, generate usage statistics, and to detect and address abuse.

Tuesday, 8 August 2023

Addicted to Stamps and More! Challenge #452

It's so nice that we had a long weekend here. Love when I can spend time crafting, listening to music. This is my idea of a good, long weekend. 

Unfortunately, it's Tuesday and for me, I have to go to work. However, we have a new challenge starting at Addicted to Stamps and More!


Here's my card


I thought that I'd make a card with a row of Christmas trees and have the trees colored in rainbow order. For my card, I used Winnie & Walter's Scenery Holiday Trimmings stamp set. I positioned the stamp in my MISTI and masked the "neighbouring" trees as I inked a tree with pieces of Post-it Tape. To ink my trees, I used PinkFresh Studio's Blue Jay, Aquamarine, Key Lime, Sunshine, Clementine, Passion Fruit inks and Lawn Fawn's Sugarplum ink. For the sentiment, I heat embossed with silver embossing powder using Clearly Besotted's Sentimental Type stamp set. If I had planned this card, it would have been a one-layer card. However, when I started, I wasn't sure where I would end up. So, I started with a white A2 card panel, which I adhered to a white A2 card base to complete my card.

We'd love to see your Christmas cards in our gallery this fortnight.

Thanks for stopping by
sue

This site uses cookies from Google to deliver its services and analyze traffic. Your IP address and user-agent are shared with Google along with performance and security metrics to ensure quality of service, generate usage statistics, and to detect and address abuse.

Happy Little Stampers ~ Anything Goes with Dies ~ August Challenge

If you're in a rush to make a card, I'd like to suggest using PinkFresh Studio's washi tape and coordinating die. I'll show you below. Talking about dies, it's time for a new challenge at Happy Little Stampers ~ Anything Goes with Dies


Here's my card


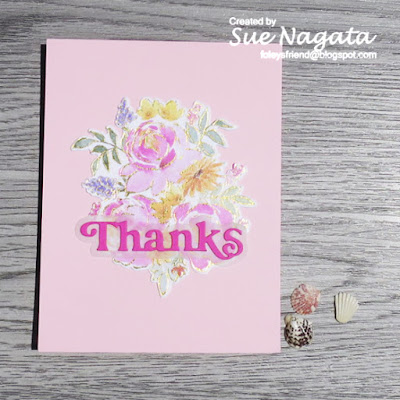
For my card, I used PinkFresh Studio's Painted Peony washi tape (it's 4" wide) and applied one design segment onto some white cardstock. I then die cut it with the coordinating die. I think that you end up with about 8 separate die cuts of varying sizes. I chose this bouquet and adhered it to a pink A2 card panel. For the sentiment, I die cut using a bright pink and Simon Says STAMP's Thanks die and I die cut the shadow using some vellum. I carefully placed the dots of glue behind the Thanks die cut (so it would be hidden) and adhered the die cut to the vellum and the vellum to the card panel. Three die cuts and adhering washi tape to cardstock and you're done. It's pretty simple and fast!

We'd love to see how you're inspired using die cuts. Please add your cards to our gallery this month.

Thanks for stopping by
sue

This site uses cookies from Google to deliver its services and analyze traffic. Your IP address and user-agent are shared with Google along with performance and security metrics to ensure quality of service, generate usage statistics, and to detect and address abuse.

Monday, 7 August 2023

Atlantic Hearts Sketch Challenge #537

It's a holiday Monday here and I almost forgot that to write my Atlantic Hearts Sketch Challenge post. It's still Monday here on the West Coast - phew, I remembered. Here's our sketch


Here's my card


I chose a 6x6 paper pack to work with for this card as I was looking for several patterned papers that coordinated. I ended up with Echo Park's 6x6 Paper Pad - This & That. I chose six patterned papers and cut them, closely following the sketch. I ended up using 1 1/4" strips and cut them into various sized rectangles. For the sentiment, I used Papertrey Ink's Keep It Simple: Thank You stamp set and PinkFresh Studio's Aquamarine ink, stamped on a scrap of natural cardstock. I trimmed it and matted it with dark brown. I adhered all the pieces to a natural A2 card base to complete my card.

We'd love to see how you're inspired by our challenge.

Thanks for stopping by
sue

This site uses cookies from Google to deliver its services and analyze traffic. Your IP address and user-agent are shared with Google along with performance and security metrics to ensure quality of service, generate usage statistics, and to detect and address abuse.

Sunday, 6 August 2023

Happy Little Stampers ~ August Stencil Challenge

Do you like working with stencils? I really like working with stencils. They make it look like I have some serious skills. When in fact, all I do is add color with oval ink blending brushes and some ink. If you like working with stencils or are intrigued to give them a go, well, we have a challenge for you at Happy Little Stampers ~ Stencil Challenge.


Here's my card


For my card, I used a newly purchased Simon Says STAMP's Bold Geometric stencil and distress inks - blueprint sketch, mermaid lagoon, peacock feathers, mustard seed, mowed lawn, spiced marmalade, peacock feathers applied with oval ink blending brushes. I trimmed the panel slightly and added a dark gray mat. I used the same dark gray and die cut the sentiment using Simon Says STAMP's Thank You die. I die cut the shadow of SSS's Thank You die from vellum so I wouldn't cover up too much of the bright stenciled area. 

We'd love to see your stenciled creations in our gallery this month.

Thanks for stopping by
sue

This site uses cookies from Google to deliver its services and analyze traffic. Your IP address and user-agent are shared with Google along with performance and security metrics to ensure quality of service, generate usage statistics, and to detect and address abuse.

Friday, 4 August 2023

Happy Little Stampers ~ August Christmas Challenge

August is the perfect time to start on Christmas cards - no pressure! Besides, thinking about the North Pole and snowflakes may help you think "cool". If you're game, we have a challenge at Happy Little Stampers ~ Christmas Challenge that we hope will inspire you.


Here's my card


I have to say that it doesn't happen that often but sometimes, I choose the patterned paper first and then have a palette of colors that I can use when I add color to the stamped image. I picked out the double green chevron paper and stamped the image using Sweet 'n Sassy Stamps' Christmas Blocks stamp set with Memento Tuxedo Black ink. I used the colors from the green chevron paper to color the elf's hat and I added a few other colors too. I used Copic markers - B60, C2, E33, E50, E93, G14, R29, Y15, Y17, YG03. For the sentiment, I used The Ton's Holiday Flourish stamp set, stamped on a scrap of red cardstock and then cut a fish-tail banner on the end. I trimmed the stamped and inked panel with my trimmer and added a black mat to help it pop off the patterned paper. I adhered the A2 panel to a white A2 card base to complete my card.

We'd love to see your "elf" Christmas cards or if you choose, "no elf" Christmas cards in our gallery this month.

Thanks for stopping by
sue

This site uses cookies from Google to deliver its services and analyze traffic. Your IP address and user-agent are shared with Google along with performance and security metrics to ensure quality of service, generate usage statistics, and to detect and address abuse.

Wednesday, 2 August 2023

Happy Little Stampers ~ August Birthday Challenge

Any of your family or friends have August Birthdays? If you don't have their card already made, consider joining us at Happy Little Stampers ~ Birthday Challenge


Here's my card


For a change, I started this card with the background patterned paper. It provided me with the colors for my card. I used a Photoplay SCT Delivered Exclusive stamp and die from Crop & Create Delivered October 2021. I stamped the image with Memento Tuxedo Black ink, added color with Copic markers - BG23, Y15, YG63, YR04 and then die cut the image out. For the sentiment, I used the same stamp set with silver embossing powder. I attached this A2 panel to a white A2 card base with double sided tape to complete my birthday card. 

We'd love to see your birthday card creations in our gallery this month.

Thanks for stopping by
sue

This site uses cookies from Google to deliver its services and analyze traffic. Your IP address and user-agent are shared with Google along with performance and security metrics to ensure quality of service, generate usage statistics, and to detect and address abuse.

Tuesday, 1 August 2023

Try Stampin' On Tuesday ~ Challenge #618

Hello Tuesday! It's time for a new challenge at Try Stampin' On Tuesday

This is a technique &/or sketch challenge. Will you be inspired to create a slimline card or will you be inspired by the sketch or both? Here's my card


I went for the "both" challenge - a slimline (actually a mini slimline 6" x 3 1/2") and I followed the sketch. I die cut the heart shapes using a Memory Box's Cherub Hearts die. For the bride, I die cut using a white shimmer cardstock (it doesn't photograph) and for the groom, I die cut both a black and white heart. I trimmed the black heart by cutting a "V" shape for jacket, exposing the white shirt behind. I added tiny adhesive pearls on both the bride's and groom's hearts. For the sentiment, I stamped it using Lawn Fawn's Wavy Sayings stamp set and die cut it using the matching die from Lawn Fawn's Simple Wavy Banners die set. I adhered everything to a light gray mini slimline card base to complete my card.

We'd love to see how you're inspired by our challenge for the next fortnight. Please add to our gallery.

Thanks for stopping by
sue

This site uses cookies from Google to deliver its services and analyze traffic. Your IP address and user-agent are shared with Google along with performance and security metrics to ensure quality of service, generate usage statistics, and to detect and address abuse.