Tuesday, 3 June 2025

Addicted to Stamps and More! Challenge #494

We have a new challenge at Addicted to Stamps and More! Our next challenge in our rotation is


Here's my card


Sadly, I've needed some sympathy cards recently. I used a technique I saw Gina K do here. I adapted it to work for me. I used the silhouette stamp from Gina K Design's Wild Blossoms stamp set. I stamped it on a white A2 panel for my base and again on three panels of gray, in differing shades. I cut four 1/2" strips from the bottom. I adhered one strip from each color over the original stamped panel, leaving the bottom 1/2" original. If you're following along, I have extra 1/2" strips. So I stamped two more panels for a base and adhered the gray 1/2" strips. Boom - three cards. Here they are. I tried a light gray base, not sure if it worked as well as the white base.


I adhered the panels to white A2 note cards to complete my cards. Three more sympathy cards for my stash.

We'd love to see your "any occasion" cards in our gallery.

Thanks for stopping by

sue


This site uses cookies from Google to deliver its services and analyze traffic. Your IP address and user-agent are shared with Google along with performance and security metrics to ensure quality of service, generate usage statistics, and to detect and address abuse.

Saturday, 31 May 2025

Die Cut Divas ~ Watercolouring with Art Impressions

 Hello Crafty Friends! Our challenge for May at Die Cut Divas is

Real or Faux Watercolouring

(or use water on your card - LOL!)

Our sponsor this month is Art Impressions. They will be giving our winner a $25 gift card to their online store. Thank you Art Impressions!


Here's my card


For my card, I started with Art Impressions - Freebie - Market that I received with my last order. I stamped it with Versafine Onyx Black ink on some 100 lb bristol. I watercoloured using distress inks (worn lipstick, cracked pistachio, tumbled glass, victorian violet, weathered wood, fired brick, lucky clover). I smooshed the ink on a plastic place mat and picked up the ink with a wet brush. I die cut the image using an Art Impressions' Journal Oval Frames die. I used the same die set for the scalloped oval mat. I adhered both ovals together and then onto a teal A2 card panel. I stamped the sentiment using Clearly Besotted's Many Mini Messages. I felt something was missing. So, I added a little bow to the upper left of the ovals. 

There are only hours left in our May Challenge. We'd love to see your creations in our gallery.

Thanks for stopping by

sue


This site uses cookies from Google to deliver its services and analyze traffic. Your IP address and user-agent are shared with Google along with performance and security metrics to ensure quality of service, generate usage statistics, and to detect and address abuse.

Addicted to CAS ~ Challenge #284

Time for the next challenge at Addicted to CAS. Our code word for the next fortnight is


Isn't this just the perfect Code Word for spring? Here's my card.


For my card, I started with My Favorite Things' oval Extraordinaire stencil, a white A2 panel and my Make Art STAY-tion. I lined things up and ink blended using distress inks - cracked pistachio, peacock feathers and mermaid lagoon applied with oval ink blending brushes. I removed the stencil and put away my Make Art STAY-tion. With the white A2 panel, I stamped the floral image using STAMPlorations' Blossom Sprays #1 and the sentiment using Clearly Besotted's Many Mini Messages. I felt that my image was a little lop-sided so I trimmed it a bit and adhered it to a white A2 card base to complete my card.

We'd love to see your floral cards in our gallery.

Thanks for stopping by

sue


This site uses cookies from Google to deliver its services and analyze traffic. Your IP address and user-agent are shared with Google along with performance and security metrics to ensure quality of service, generate usage statistics, and to detect and address abuse.

Tuesday, 27 May 2025

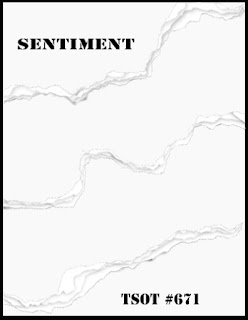
Try A Sketch On Tuesday ~ Challenge #671

Looking for some inspiration to get crafty? We have a new challenge starting at Try A Sketch On Tuesday. Here's our sketch.


Here's my card


I thought about tearing some teal paper to create the jagged lines of the sketch. Instead, I chose to use Lawn Fawn's Ocean Wave stencil Lawn Clippings and distress inks - peacock feathers, tumbled glass and mermaid lagoon, applied with oval ink blending brushes. I altered the position of the stencil, including using the reverse side to get some uniqueness in the waves. For the critters, hearts and bubbles, I used Lawn Fawn's Shello Friend stamp set and Versafine Onyx Black ink. I added color to the images using the coordinating coloring stencils and Concord & 9's honeysuckle, grapefruit, creamsicle inks and more tumbled glass distress ink all applied with mini ink blending brushes. I die cut the images out with the coordinating dies. I received all the Lawn Fawn products as part of Scrapbook & Cards Today's Crop & Create Delivered March 2025 event. I added some sparkle to the images using a glue pen and some glitter. Here's a close-up.


I glued all the die cuts to the background panel and then adhered the panel to a white A2 card base with double-sided tape to complete my card.

We'd love to see what you create starting with our sketch. Looking forward to seeing your creations in our gallery.

Thanks for stopping by

sue


This site uses cookies from Google to deliver its services and analyze traffic. Your IP address and user-agent are shared with Google along with performance and security metrics to ensure quality of service, generate usage statistics, and to detect and address abuse.

Monday, 26 May 2025

Atlantic Hearts Sketch Challenge #631

One of the difficult things about getting home from a three week holiday in a completely different time zone is jet lag and brain fog. I have no idea what day it is. However, it's still Monday for a few more hours here on the West Coast. Monday means that it's time for a new challenge at Atlantic Hearts Sketch Challenge. Here's our sketch


Here's my card


For my card, I used Concord & 9's supplies that I received as part of Scrapbook & Cards Today's Crop & Create Delivered March 2022. I started with Concord & 9's Confetti Dots Turnabout Stencil and Concord & 9's honeysuckle, oceanside and buttercup inks. I ink blended with one color using oval ink blending brushes. Then, I cleaned off the stencil and rotated it 90 degrees and ink blended the second color. I cleaned off the stencil, rotated it 90 degrees and ink blended the third color to achieve the pretty confetti dots. I cut two panels 3 3/4" x 1 1/4". For the center panel, I heat embossed with white embossing powder the sentiment using Concord & 9's Pop-Up Par-tay stamp set onto some Concord & 9's honeysuckle paper. I die cut the balloon using using the coordinating Concord & 9's Pop-Up Par-tay die. I cut a piece of yellow cardstock 3 3/4" x 2 1/4". I stamped the balloon string using the same stamp set with honeysuckle ink. For the sentiment banner, I stamped the sentiment using the same stamp set with oceanside ink onto a scrap of white cardstock which I cut into a double fishtail banner. I glued the balloon to the yellow cardstock and adhered all the pieces onto a teal A2 card panel with double sided tape. To complete my card, I adhered the teal panel to a white A2 card base with double sided tape.

We'd love to see how you're inspired by our sketch. We look forward to seeing your creations in our gallery.

Thanks for stopping by

sue


This site uses cookies from Google to deliver its services and analyze traffic. Your IP address and user-agent are shared with Google along with performance and security metrics to ensure quality of service, generate usage statistics, and to detect and address abuse.
Sunday, 25 May 2025

AAA Cards ~ Challenge #291

Ready for a new Clean and Simple card challenge? We'd love for you to join us at AAA Cards. Our challenge this fortnight is 


And the leader's card is this one


Here's my card


I used the same gold and black color palette with some gold heat embossing. For my card, I used supplies that I received as part of Scrapbook & Cards Today's Celebrations Delivered event, held February 2023. I die cut the grad cap and sentiment with black cardstock. The tassel was cut from gold cardstock. For the sentiment, I applied some Versamark ink, (direct ink to paper) to the lower part of the sentiment die cut and added gold embossing powder which I heat embossed. I trimmed the white A2 panel slightly and to a black A2 panel, I applied some Versamark ink to the lower edges and heat embossed with gold embossing powder. I adhered the white panel to the black with double-sided tape and glued the cap, tassel and sentiment to the white panel. To finish my card, I adhered the black panel to a white A2 card base with double sided tape.

We'd love to see how you're inspired by our Leader's card. Looking forward to seeing your creation in our gallery.

Thanks for stopping by

sue


This site uses cookies from Google to deliver its services and analyze traffic. Your IP address and user-agent are shared with Google along with performance and security metrics to ensure quality of service, generate usage statistics, and to detect and address abuse.

Tuesday, 20 May 2025

Addicted to Stamps and More! Challenge #493

A new challenge is starting at Addicted to Stamps and More! For the next two weeks, our challenge will be


Here's my card


I started with a white A2 card panel and My Favorite Things' Rectangle Extraordinaire stencil. I used my Wendy Vecchi's Make Art STAY-tion to hold the stencil and card panel in place. I added distress inks - mustard seed, picked raspberry, tumbled glass, twisted citron applied with oval ink blending brushes. It was interesting as colors overlapped, new colors emerged. It really looks like I used more than four colors. I then ran the panel through the Spellbinders' Embossing Folder of the Month for May 2023. I used Simon Says STAMP's Happy Birthday Script die and some mid-gray cardstock. I added some clear Wink of Stella for a bit of sparkle. I glued it in place. To complete my birthday card, I adhered the panel to a white A2 card base with double-sided tape.

We'd love to see your Birthday cards in our gallery.

Thanks for stopping by

sue


This site uses cookies from Google to deliver its services and analyze traffic. Your IP address and user-agent are shared with Google along with performance and security metrics to ensure quality of service, generate usage statistics, and to detect and address abuse.